SCANMATE i1150WN Scanner FAQs
Below are frequently asked questions for all our products.
For more specific questions, select your product by typing the name in the field below.
Below are the frequently asked questions for the SCANMATE i1150WN Scanner.
Select another product by typing the name in the field below.
Installing
-
What information do I need before installing the driver?
- Check OS Compatibility
- Minimum system requirements are met (see User’s Guide)
- Understand how you and other users want to connect to the scanner
- Router SSID, passwords, etc.
Using
-
Are the i11xxWN scanners compatible with USB 3.0?
Yes, they are compatible and provided a USB cable in the box.
-
How do I use Smart Touch?
Refer to the User's Guide for Smart Touch for information about using this software.
-
Can I use HTTPS to access the embedded scanner’s webpage?
Yes; however, when you use “https,” you will receive a warning that your connection is not private, or that the certificate provided by the website was not issued by a trusted certificate authority. (This error can occur because Alaris cannot provide certificates for individual, isolated ad hoc connections for each scanner.)
We recommend that you accept the warning to continue to the website. Data encryption will be provided on your local network.
-
Why can’t I configure my scanner when using Windows 8.1 or Windows 2012 Server R2 x64 Edition?
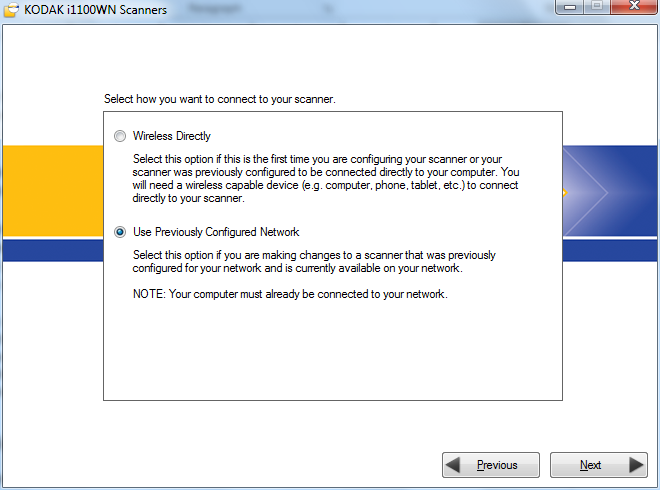
In this scenario, when you start to configure your scanner and reach to the point when you select “Use Scanner” and the next page that is displayed is as follows: Select “Use Previously Configured Network”
The next page will ask for an IP address; Press ‘i’ button on the scanner and note the Wireless / Wired IP address. And write down this IP address in the Text box in the installation tool. And click Next.
This will direct you to the Scanner’s webpage. You can make this IP address static by clicking on the “Use the following IP address” radio button.
Fill in the information and save the settings and this will make you scanner’s IP address static. Go back to the installation tool and finish the configuration.
-
Do I need to have a PC to setup or use the scanner?
→A PC is not required to setup or use the scanner. (Hit the ‘i’ button)
→An EasySetup page can be used to setup the scanner
→You can configure your i11xxWN scanner from a mobile device browser
-
How can I find my wireless network SSID, security settings and password from a Windows PC?
You may be able to obtain these settings by following these steps:
- Click the Start button, then search for and open “View Network Connections.”
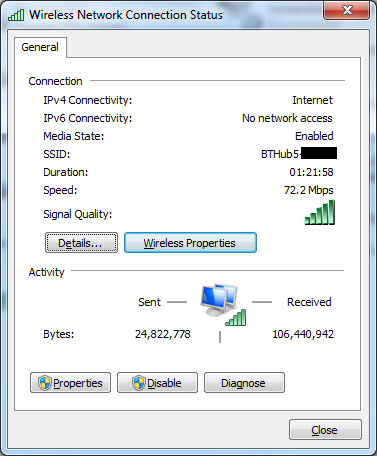
- Right-click your wireless network connection, then select Status. The SSID will display in the Connection section of the Status Screen.
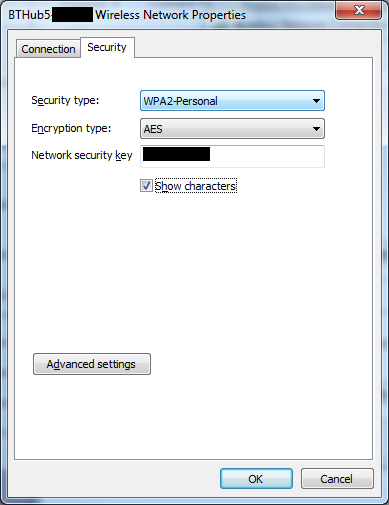
- Click the “Wireless Properties” button, then select the Security tab. The Security and Encryption types will display.
- Click the “Show characters” check box to view the security key/password.
- Click the Start button, then search for and open “View Network Connections.”
-
How can I obtain professional services and support for the scanner?
For information on how to contact Kodak Alaris support, please visit Kodak Alaris Services and Support.
-
If the scanner’s OCP shows that it is in use, how can I scan?
Wait for current scanning job to finish, or cancel the current user’s session by pressing the X button on the scanner
-
How do I reset the (Scan Station) settings to the factory defaults?
Two ways to factory reset
1. Using the reset button on the back of the scanner
Turn off the scanner by pressing the power button. Press and hold the reset buttonat the back of the scanner and press the power button. Continue holding the reset button until the scanner completely powers on and the Operator Control Panel (OCP) displays “Configuration Reset to default.” This will reset all the settings to the factory default
2. Using EasySetup page
→ Create an EasySetup sheet with the factory default setting and it can be used whenever you want the scanner to reset with factory defaults.
→ To use the EasySetup sheet just press and hold the ‘i’ button on the scanner until the OCP displays “Scanner in use by EasySetup.” Place the EasySetup sheet in the input tray and press the scan button. Once the scanning is done, the OCP will display “EasySetup Successful”OCP → Operator Control Panel
-
How do I save scanned images to a different file format?
If you are using Smart Touch it will allow you to select many destinations and file types for the storage of your scanned documents.
If you are using a third party application which supports TWAIN and ISIS drivers, then you will be able to save into different file formats.
-
How does one change the connectivity settings of the scanner?
For information on how to change the connectivity of the scanner, refer to Videos.
-
Is it possible to use the scanner directly using the mobile app?
Power On the scanner. Press the ‘i’ button to note the scanner’s Wireless directly (ad hoc) SSID. Download the mobile app of the scanner for Apple iOS and Android devices. Connect your mobile app to the scanner’s SSID network and scan. If any encryption is enabled on the ad hoc network, then the Security Key will be required to connect the mobile device to scanner. No other steps required other than to load the app.
-
What is EasySetup?
EasySetup is a process that generates a secure barcode of the network and device settings that can be configured on the scanner. This secure barcode sheet when scanned on a scanner will automatically set the scanner to the same settings. Refer to the User’s Guide for more information. This can be created from: www.kodakalaris.com/go/EasySetup.
-
What is the default location where the scanned images are saved?
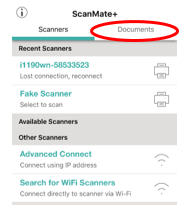
Android /iOS: Inside ScanMate+ application → ‘Documents’ section
-
What is the file type of documents that are shared?
Documents are shared in PDF format for compatibility with many applications.
-
What is the range of the Wireless Network Card?
The range of the scanner’s Wireless Network Card can vary based on the work environment and obstructions. Even the use of a microwave can cause a momentary drop of signal quality. 75ft./25m is the maximum range of the scanner’s inbuilt Wireless Network Card.
-
What is the use of ‘i’ button?
When the user presses ‘i’ button on the scanner’s OCP it displays information like:
- SSID
- Wireless IP Address / Wired IP Address (Whichever may be the case)
- Firmware Version
- Subnet Mask
- MAC Address
It is also used when you want to scan an EasySetup page.
-
What is the use of Scan Validation Tool?
This is a Kodak Alaris application to test connectivity and gather diagnostic information.
-
Where are my EasySetup pages stored on the host PC?
EasySetup pages can be stored at any location as per user’s choice. The path that opens up will be your browser’s default Downloads folder.
-
Where can I find the program that is used to change the connection mode?
Go to Start → All Programs → Kodak → Document Imaging → i11xxWN → Setup and Connect Scanner.
Run the Setup and Connect Scanner and follow the steps as per the wizard.
You can change the connection modes like Wired Ethernet, Wireless network and Wireless directly (ad hoc) from the scanner’s webpage (IP address to which the scanner is configured).
-
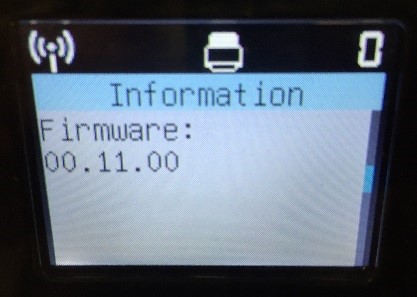
Where can I see my drivers and firmware version?
On Scanner:
Press the ‘i’ button on the scanner and press the down arrow until you see the Firmware version installed on the scanner.
On PC/Laptop:
Login into the scanner’s webpage and click on the ‘Status’ tab. It will display all the settings that are currently selected for the scanner including firmware version.
For the software version open Control Panel → Program and Features. KODAK i11xxWN Scanners
-
Where is Scan Validation Tool (SVT) located?
- Go to Start → All Programs → Kodak → Document Imaging → i11xxWN → SVT Diagnostics (For 32 bit)
- Go to Start → All Programs → Kodak → Document Imaging → i11xxWN → SVT Diagnostics (64 bit) (For 64 bit); after installation of the drivers
-
Which Mobile OSes are compatible with the ScanMate+ Mobile App?
IOS Android 8.4 4.2 (Jelly Bean) 9.0 4.4 (KitKat) 9.2 5.0 (Lollipop) 9.3 (5.1 (Lollipop)
-
Which WINDOWS operating systems are compatible with this scanner?
- WINDOWS 7 (32-bit and 64-bit) with SP1
- WINDOWS 8 and 8.1 (32-bit and 64-bit)
- WINDOWS 10 (32-bit and 64-bit)
- WINDOWS 2008 Server R2 x64 Edition
- WINDOWS 2012 Server R2 x64 Edition
-
Which wireless security protocols are supported?
Wireless Directly (ad hoc) Wireless Network WPA Personal [TKIP] WEP (Not Secure) WPA2 Personal [AES] WPA/WPA2 Personal WPA/WPA2 Personal The recommended protocol for use of our scanner is WPA/WPA2 Personal. Our scanner will first attempt WPA2 Personal [AES], then fall back to WPA Personal [TKIP]. AES is an encryption algorithm, and TKIP is an integrity check.
-
Why am I not able to communicate with the scanner?
If the scanner was configured with an IP address that is DHCP. There is a possibility of the DHCP address getting changed over time. To avoid this scenario, you can make the IP address static or create a DHCP reservation.
-
Why do we need to press the scan button on the scanner when connected in Wireless or Wired Network mode?
-
The scanner is designed in such a way, when a user is accessing it through USB the scan button is not required as it is dedicated to just one user.
When using it in Wireless / Ethernet mode, the scanner can be shared among multiple users. So a session has to be locked when it’s used by an individual user. This feature enables you to confirm who the user is that holds the scanner locked before putting the document into the scanner. The scanner will display the ID of the user who has locked the scanner.
-
-
Why is my scanner displaying locked by user even when it not in use?
When Hosts initialize which have installed TWAIN drivers configured to use a i1100WN scanner the scanner will be locked a number of times as the Host boots and that application gathers data. This will take a few lock sessions per host. So if a number of Hosts sharing a scanner are rebooted etc. this behavior can be observed on the scanners OCP and that is normal.
-
Why is the EasySetup page not displayed when selecting “Generate EasySetup Sheet”?
Some web browsers may not display the EasySetup document, but would enable you to save the PDF to your system. Check and see if pop up blockers are enabled (turned on) in the settings for your browser. If they are enabled (ON) then disable them (turn OFF).
-
Why is there a exclamation mark displayed over the Wireless icon on my scanner?
If an exclamation mark is displayed over the Wireless icon, wait at least 1-2 minutes.
- If the exclamation mark is red, the Wireless Network currently cannot be associated for any number of reasons (e.g., incorrect SSID, incorrect security key, unsupported encryption type, not ready, etc.). SSID and Security Key are case dependent.
- If the exclamation mark is yellow, an IP address has not been assigned due to a slow or improperly configured router.
Troubleshooting
-
How can I wake up my scanner when in Sleep Mode?
The scanner will automatically wake up if you initiate a scan from PC or Mobile device.
To wake up the scanner from sleep mode press any button on the scanner’s front panel or insert a paper in the input tray.
-
Why can’t I access the scanner using the scanner name?
The DNS does not resolve the name across subnets. You can use a DHCP reservation to avoid this issue.
-
The wireless network icon on the scanner’s OCP has an exclamation through it. How can I reconnect to the scanner?
Wait – few minutes based on the environment wait time can be extended.
Recheck PC network selection. This can change based on PC network priority settings.The settings entered for the wireless network may be invalid, the wireless directly (ad hoc) (router) settings may have changed or the scanner is no longer in range of the access point (router). First move the scanner closer to the wireless directly (ad hoc) (router) to see if a connection is established. If this is unsuccessful reset the scanner to defaults (for more information refer to, “how do I reset to factory defaults?” FAQ) then refer to the Setting Up and Connecting Your Scanner section of the User’s Guide.
-
Why does my scanner pause/slow down?
- Obstructions
- Router
- Distance
- How is your wireless network configured?
-
Why does my scanner wired/wireless network connection not work when connected via USB?
Wireless connectivity is for multiple users and USB is for a single dedicated user. When the scanner is connected via USB it turns off the discovery of wireless network and disables the wired network, but it can still function in Wireless directly (ad hoc) mode. Mobile devices will still work wirelessly as long as the wireless switch is ‘On’.
Disconnecting the USB cable or powering down your PC will re-enable the wired network or discovery on your wireless network connection.
-
Why doesn’t my scanner connect to a Wired Network?
- Verify that the Host PC / mobile device is connected to the same wired network that you want to connect to.
- Recommendations to prevent connection issues:
- Move the scanner, computer, and access point (router) so they are in close proximity.
- Check the Wired IP address that is assigned to the scanner when you connect the Ethernet cable. If the Wired IP address is not static or you do not use a DHCP reservation, the IP address can change (and your scanner won’t be connected).
-
Why doesn’t my scanner connect to a Wireless Network/Wireless Directly?
- Recommendations to prevent connection problems:
- Move the scanner, computer, and access point (router) so they are in close proximity.
- Move devices that can cause interference (microwaves or cordless telephones) away from the scanner, computer, and access point (router).
- Check with the access point (router) manufacturer for updates or configuration changes that could help improve the connection.
- The Host Wireless Network is disabled if a USB cable is connected to the scanner. An ad hoc network will be available for mobile devices.
- Verify that the SSID you are trying to connect to is correct.
- Verify that the Security Key and encryption type selected for the scanner are the same as those of your network router.
- If you use the wireless option, check the distance between the scanner and the router.
- Recommendations to prevent connection problems:
-
Why is the scanner not available in Windows Control Panel?
-
- When an S2000 scanner is connected via a network connection, it will not display in the Device Manager > Imaging devices.
- An S2000 Scanner is only available in Device Manager > Imaging devices when it is connected via USB.
-
Maintaining
-
How do I update a driver?
The latest updates are available on the product webpage.
www.kodakalaris.com/go/i1150WNsupport or
www.kodakalaris.com/go/i1190WNsupport
-
What can I do to help prevent paper jams?
Remove Staple pins, clips or any other accessories that can be used to attach papers.
-
What supplies and consumables are available for KODAK Scanners?
For information about available materials, see the Supplies and Consumables Catalog for KODAK Scanners
ABOUT THE ALARIS DIVISION OF KODAK ALARIS
Kodak Alaris is a leading provider of information capture and intelligent document processing solutions that simplify business processes. We exist to help the world make sense of information with smart, connected solutions powered by decades of image science innovation. Our award-winning software, scanners, and professional services are available worldwide and through our network of channel partners.
Partners
Privacy Notice | Legal / Site Terms | California Notice at Collection | Do Not Share My Personal Information
© 2024 Kodak Alaris Inc. TM/MC/MR: Alaris, ScanMate. All trademarks and trade names used are property of their respective holders. The Kodak trademark and trade dress are used under license from Eastman Kodak Company.
