SCANMATE i940 Scanner FAQs
Below are the frequently asked questions for the SCANMATE i940 Scanner.
Select another product by typing the name in the field below.
Utilizando
-
¿Cómo funciona Smart Touch?
Consulte la Guía del usuario de Smart Touch para obtener información sobre el uso de este software.
-
¿Cómo puedo solicitar los servicios profesionales?
Para obtener información sobre cómo ponerse en contacto con el servicio de asistencia de Kodak Alaris, visite Servicios y asistencia de Kodak Alaris.
-
¿Cómo puedo consultar la versión de SVT/controlador?
- Abra el Panel de control > Agregar y quitar programas (XP) o, Programas y características (Vista &7).
- Desplácese hacia abajo hasta Kodak [Modelo de escáner] Scanner
- Vista y 7 – La versión se encuentra en la columna del extremo derecho. Anote la versión.
- XP - Haga clic en el enlace ‘Haga clic aquí para obtener información de soporte’. Anote la versión.
Solución de problemas
-
¿Qué hago si mi escáner funciona con lentitud?
- Es posible que su PC host no cumpla los requisitos mínimos del escáner. Consulte el Apéndice A, Especificaciones, en la Guía del usuario.
- Algunas funciones de procesamiento de imágenes pueden reducir la velocidad del escáner.
- Su resolución (ppp) para la salida de imágenes puede ser demasiado alta.
- Su ajuste de compresión puede ser demasiado bajo.
- Su software antivirus puede estar escaneando todos los archivos TIFF o JPEG.
- Compruebe que está escaneando a una unidad local.
-
¿Qué hago si mi escáner funciona lentamente?
- Es posible que su PC host no cumpla los requisitos mínimos del escáner. Consulte el Apéndice A, Especificaciones, en la Guía del usuario.
- Algunas funciones de procesamiento de imágenes pueden reducir la velocidad del escáner.
- Su resolución (ppp) para la salida de imágenes puede ser demasiado alta.
- Su ajuste de compresión puede ser demasiado bajo.
- Su software antivirus puede estar escaneando todos los archivos TIFF o JPEG.
- Compruebe que está escaneando a una unidad local.
-
Conectividad: ¿Qué debo hacer si el ordenador no reconoce el escáner?
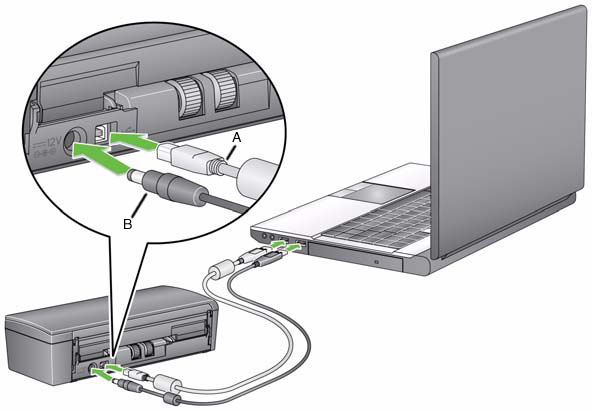
Verifique que el cable USB está asentado en un puerto USB del ordenador y del escáner.
Compruebe las conexiones:
- Conecte el cable de alimentación y compruebe que está completamente asentado en el conector de alimentación de la parte posterior del escáner.
- Conecte el cable de alimentación y compruebe que está completamente asentado en el conector de alimentación de la parte posterior del escáner.
- Conecte el enchufe del cable de alimentación a una toma de corriente que funcione.
NOTA: si se utiliza un interruptor de pared o una regleta, compruebe que estén encendidos.
- Abra la cubierta superior
¿Está el LED verde de mayor que > encendido de forma continua?
Si no
Verifique que la toma de corriente funciona correctamente.
- Desenchufe el cable de alimentación del escáner de la toma de corriente.
- Enchufe otro dispositivo a la toma de corriente.
Mantener
-
Calidad de imagen: ¿Cómo puedo mejorar la calidad de imagen?
Limpie el escáner mediante el procedimiento que se explica a continuación:
PRECAUCIÓN:- No utilice productos de limpieza que se apliquen con pulverizadores de aire, líquido o gas.
- No utilice productos de limpieza en superficies calientes.
- Deje que las superficies se enfríen a temperatura ambiente antes de utilizarlos.
- Utilice una ventilación adecuada. No utilice productos de limpieza en áreas cerradas.
- Desconecte el cable de alimentación del escáner antes de proceder con la limpieza de las piezas internas.
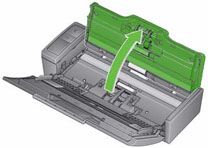
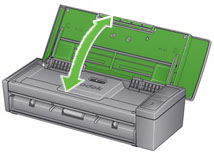
- Abra la cubierta superior.
- Abra la cubierta del escáner.
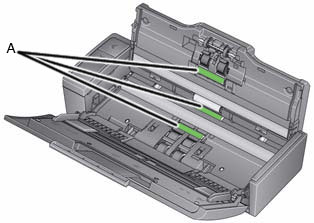
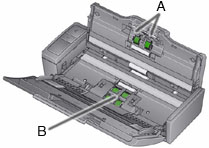
- Con una almohadilla de limpieza para rodillos, limpie los tres rodillos de alimentación (A) de lado a lado. Gire los rodillos para limpiar toda la superficie.
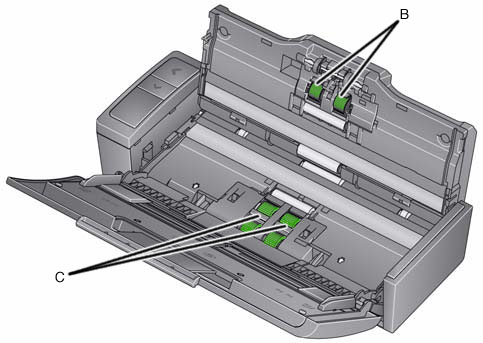
- Con una almohadilla de limpieza para rodillos, limpie los rodillos de separación (B) de lado a lado. Gire los rodillos para limpiar toda la superficie.
- Con una almohadilla de limpieza para rodillos, limpie las gomas del módulo de alimentación (C) de lado a lado. Gire los rodillos para limpiar toda la superficie.
NOTA: Para obtener más información sobre la limpieza del escáner, consulte la guía de usuario que se incluye con el producto. - Conecte el cable de alimentación al escáner.
- Cierre la cubierta del escáner.
- Digitalice los documentos.
-
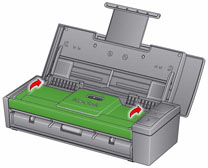
¿Cómo reemplazo el módulo de alimentación en el escáner SCANMATE i940?
Extracción del módulo de alimentación:
- Abra la cubierta superior.
- Abra la cubierta del escáner.
- Desconecte la alimentación del escáner.
- Extraiga la cubierta del módulo de alimentación:
- Apriete las pestañas situadas a cada lado de la cubierta del módulo de alimentación.
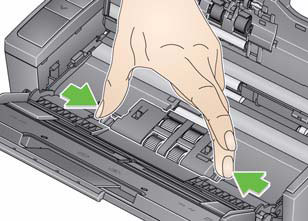
- Levante y retire la cubierta del módulo de alimentación.
- Apriete las pestañas situadas a cada lado de la cubierta del módulo de alimentación.
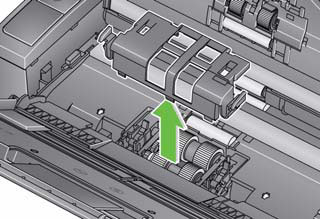
- Extraiga el módulo de alimentación:
- Empuje hacia arriba por la parte inferior para girar el módulo de alimentación.

- Levante un lado y, a continuación, extraiga el módulo de alimentación.
- Empuje hacia arriba por la parte inferior para girar el módulo de alimentación.
Instalación del módulo de alimentación:
- Inserte un lado del eje del módulo de alimentación en la ranura del bastidor.
- Inserte la otra parte y presione el módulo de alimentación para fijarlo.
- Alinee la cubierta del módulo de alimentación con la abertura del bastidor.
- Presione la cubierta del módulo de alimentación para fijarla.
- Cierre la cubierta del escáner.
- Conecte la alimentación al escáner.
-
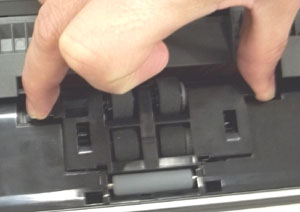
¿Cómo reemplazo el rodillo de separación en el escáner SCANMATE i940?
Extracción del rodillo de separación:
- Desconecte la alimentación del escáner.
- Abra la cubierta superior.
- Abra la cubierta del escáner.
- Abra la cubierta del rodillo de separación con la ayuda de la uña.

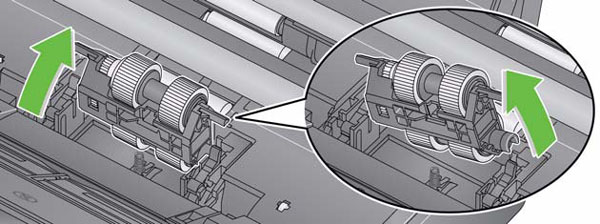
- Extraiga el rodillo de separación:
- Mantenga el rodillo de separación en los bordes externos con la ayuda del dedo pulgar y el índice.
- Tire del rodillo de separación para extraerlo.
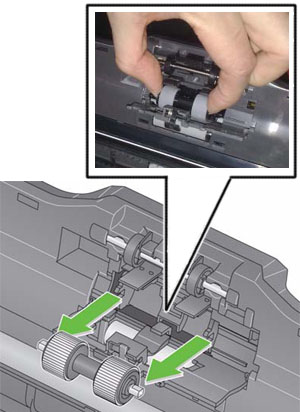
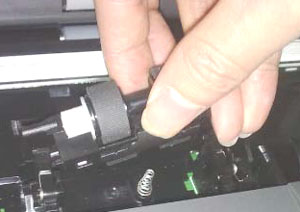
Instalación del rodillo de separación:
- Inserte el rodillo de separación con los lados planos del eje alineados con las ranuras del bastidor.
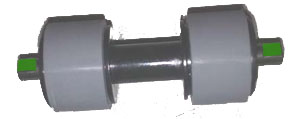
- Presione el rodillo de separación para fijarlo.
- Cierre la cubierta del rodillo de separación.
- Cierre la cubierta del escáner.
- Conecte la alimentación al escáner.
-
¿Cómo puedo resolver un código de error E4 (Error de escáner)?
Reinicie el escáner:
- Cierre la cubierta superior
- Abra la cubierta superior.
- Reinicie la aplicación de escaneado y reanude el escaneado.
-
¿Cómo puedo resolver un código de error U6 (Error de apertura de la tapa del escáner)?
Cierre la tapa del escáner.
-
¿Cómo puedo resolver un código de error U8 ( Error multifrecuencia)?
- Abra la tapa del escáner.
- Retire los documentos multifunción.
- Cambie la ventana del controlador al tipo de papel que esté utilizando.
- Compruebe que los siguientes elementos estén limpios y no desgastados:
- Rodillos de separación - A
- Rodillos de alimentación - B
- Cierre la tapa del escáner.
IMPORTANTE: Compruebe que los documentos que va a escanear cumplen las siguientes especificaciones:- Peso de papel aceptable: de 4,9 a 14,5 g/m2 (de 10,7 a 32 libras)
- Tamaño máximo del documento: 21,6 x 165,1 cm (8,5 x 65 pulg.)
- Tamaño mínimo del documento: 8,0 x 5,2 cm (3,15 x 2,05 in.)
- El número máximo de documentos en la bandeja de entrada es 20
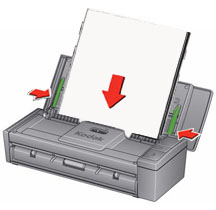
- Alinee y vuelva a cargar los documentos. No cargue más de 20 documentos en la bandeja de entrada.
- Mueva las guías hasta que apenas toquen el borde del documento.
- Reinicie la aplicación de escaneado y reanude el escaneado.
- Abra la tapa del escáner.
-
¿Cómo resuelvo un código de error U9 (Atasco de papel o error inesperado)?
IMPORTANTE: El error U9 se produce cuando hay un atasco de papel en el escáner. Este error también puede producirse cuando ocurre algo inesperado como la pérdida de alimentación durante el escaneado. Con algunos sistemas operativos de ordenadores antiguos, cuando utiliza el escáner sin la fuente de alimentación, puede producirse una situación de falta de alimentación.
¿Salió una hoja en blanco del escáner mientras estaba escaneando?
----------------------------------------------------IF YES--------------------------------------------------
- Abra la tapa del escáner
- Retire los documentos que se estén escaneando.
- Cierre la tapa del escáner.
- Compruebe las conexiones USB entre el escáner y el ordenador. Si sólo utiliza un cable USB (B), conecte el otro cable USB (A) entre el escáner y el ordenador.
- Alinee los documentos y vuelva a cargarlos en la entrada.
- Mueva las guías hasta que apenas toquen el borde del documento.
- Inicie de nuevo la aplicación de escaneado e intente escanear de nuevo.
----------------------------------------------------IF NO ---------------------------------------------------
- Abra la tapa del escáner
- Retire los documentos que se están escaneando.
- Despeje el atasco de papel:
- Inspeccione el interior del escáner en busca de trozos de papel u otros objetos extraños.
- Si es necesario, limpie:
-
- Rodillos de separación - A
- Módulo de alimentación - B
- Inspeccione el interior del escáner y límpielo si es necesario.
- Cierre la tapa del escáner.
IMPORTANTE: Compruebe que los documentos que va a escanear cumplen las siguientes especificaciones:- Peso de papel aceptable: de 4,9 a 14,5 g/m2 (de 10,7 a 32 libras)
- Tamaño máximo del documento: 21,6 x 165,1 cm (8,5 x 65 pulg.)
- Tamaño mínimo del documento: 8,0 x 5,2 cm (3,15 x 2,05 pulg.)
- Alinee los documentos y vuelva a cargarlos en la entrada.
- Mueva las guías hasta que apenas toquen el borde del documento.
- Inicie de nuevo la aplicación de escaneado y reanude el escaneado.
-
¿Cómo puedo actualizar un controlador?
- Vaya a la página de controladores y descargas situada aquí para encontrar los controladores más recientes.
- Para obtener instrucciones detalladas sobre cómo instalar un escáner, consulte la sección 2 de la Guía del usuario.
-
¿Qué suministros y consumibles hay para los escáneres Kodak Alaris?
- Consulte la Guía de suministros y consumibles para ver una lista completa de todos los suministros y consumibles para todos los escáneres Kodak Alaris.
-
¿Qué hago si mis escaneados tienen esquinas recortadas?
IMPORTANTE: si una hoja no se alimenta uniformemente desde la bandeja de entrada, el escaneado puede quedar torcido y las esquinas de la imagen pueden recortarse durante el proceso de escaneado.
Haga lo siguiente para obtener los mejores resultados cuando cargue documentos en el escáner:
- Verifique que todas las tintas y líquidos correctores estén secos.
- Retire cualquier grapa o clip de papel.
- Alinee los bordes delanteros de las hojas.
- Cargue las hojas de modo que queden centradas en la bandeja de entrada con el lado que se va a escanear en dirección opuesta a usted.
- Mueva las guías laterales hasta que apenas toquen los bordes de las hojas.
- Escanee su(s) documento(s)
-
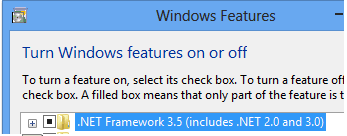
Error: ¿Qué debo hacer si aparece un error de Framework?<br />".NET Framework versión 2.0 o posterior no detectada. Es posible que algunas funciones de sincronización no funcionen correctamente."
Problema
Después de instalar el software PRESTO! BIZCARD en un sistema que ejecuta WINDOWS 8, aparece el siguiente mensaje durante la instalación o cuando se inicia el software por primera vez una vez completada la instalación:
"No se ha detectado la versión 2.0 o superior de .NET Framework. Es posible que algunas de las funciones de sincronización no funcionen correctamente."
Resolución
- Seleccione Panel de control > Programas y características
- Active la característica WINDOWS: .NET Framework 3.5
- Instale de nuevo el software PRESTO! BIZCARD.