Scan Station 710 FAQs
Below are the frequently asked questions for the Scan Station 710.
Select another product by typing the name in the field below.
Installazione
-
Quali sistemi operativi sono compatibili con il computer host utilizzato per impostare la Scan Station?
L'applicazione Scanner Administration utilizzata con la Scan Station richiede che il computer host abbia uno dei seguenti Sistemi Operativi e MICROSOFT .Net 4.0 Framework installato (questo programma verrà installato automaticamente se non viene rilevato).
- WINDOWS 10
- WINDOWS 8
- WINDOWS 7
-
Perché il programma di installazione dell'applicazione Scanner Administration non viene eseguito?
Per installare l'applicazione sul computer Host deve disporre dei diritti amministrativi.
- Verifichi di disporre dei diritti amministrativi e della password di amministratore. (Clicchi con il tasto destro del mouse sul file di installazione, selezioni Esegui come Amministratore, quindi segua le istruzioni.)
- Controllare il suo software antivirus; questo software potrebbe bloccare l'esecuzione di un'applicazione.
Utilizzando
-
Posso modificare le impostazioni dopo aver creato i lavori?
Le impostazioni dei lavori vengono modificate utilizzando l'applicazione di amministrazione dello scanner. Dopo che un lavoro è stato definito e la configurazione è stata caricata sulla Scan Station, solo la schermata Lavori verrà visualizzata sulla Scan Station (la normale interfaccia utente non verrà visualizzata)
-
Can I switch back to the manual mode after I set up Jobs?
You can access the manual mode after you remove all entries for Jobs in the configuration file (using the Scanner Administration Application). Or, you can also access the manual mode after inserting a USB drive that contains the configuration file (kss.xml). The configuration file can be exported from the Scanner Administration Application and must be named “kss.xml”. This file must also be located at the root (top) level of the USB drive.
-
Ho bisogno di un computer per configurare e utilizzare la Scan Station?
Non è necessario un computer per utilizzare la Scan Station; tuttavia, è necessario un computer per creare un file di configurazione e per installare e utilizzare l'applicazione Scanner Administration. Ci sono due metodi per configurare la Scan Station:
- Utilizzando l'applicazione Scanner Administration da un computer Host (remoto)
- Copiando il file di configurazione (kss.xml) su un'unità USB e inserendo l'unità USB nella Scan Station. Il file di configurazione può essere esportato dall'applicazione Scanner Administration e deve essere denominato "kss.xml". Questo file deve anche trovarsi nel livello principale (superiore) dell'unità USB.
-
La Scan Station dispone di porte USB ed Ethernet?
Sì, la Scan Station serie 700 ha quattro porte USB e una porta Ethernet. Le porte USB sono utilizzate per archiviare i file su una chiavetta, accedere alle impostazioni dell'amministratore, configurare la Scan Station e collegare una tastiera USB.
-
Come posso determinare la versione del firmware e il sistema operativo (OS) della Scan Station?
Ci sono due modi per trovare queste informazioni:
- Sulla Scan Station, tocchi l'icona.
- Sul computer host, apra l'applicazione Scanner Administration. Selezioni lo scanner dalla griglia e clicchi sull'icona.
-
Come posso ottenere servizi professionali e assistenza per lo scanner?
Per informazioni su come contattare l'assistenza Kodak Alaris, visiti Servizi e assistenza Kodak Alaris.
-
-
Come posso ripristinare le impostazioni di (Scan Station) ai valori predefiniti?
- Copi il file di configurazione nel livello superiore di un'unità USB e verifichi che il nome del file sia kss.xml.
- Inserisca l'unità USB nella Scan Station.
- Selezioni No ai prompt.
- Selezionare l'icona Scan Station
- Selezioni Avvio dell'installazione guidata.
- Seleziona Avvia la procedura guidata o Esegui la procedura guidata al prossimo riavvio.
- Rimuovere l'unità USB.
Per resettare le impostazioni di configurazione:
- Creare un file di configurazione predefinito.
- Carica il file di configurazione sulla Scan Station.
-
Come posso salvare i file di log degli errori?
Il personale dell'assistenza potrebbe chiederle di fornire file di registro per aiutare a diagnosticare un problema. Può inviare i file di registro come allegato a un'e-mail.
Ci sono due modi per ottenere i file di log:
Utilizzando l'applicazione Amministrazione scanner:- Aprire l'applicazione Scanner Administration sul computer host.
- Clicchi sulla scheda Scanner.
- Selezioni Scanner > Dispositivo, quindi selezioni "Salva tutti i registri...".
- Salvare il/i file.
Utilizzando un'unità USB:
- Crea un file di configurazione e lo salva su un'unità USB inutilizzata. Verifichi che il nome del file sia kss.xml.
- Inserisca l'unità USB in una porta USB della Scan Station.
- selezioni - No alle richieste.
- La Scan Station visualizzerà le icone delle impostazioni.
- Utilizzi le frecce per scorrere fino a Diagnostica (l'icona della chiave inglese). Selezioni l'icona.
- Selezioni Salva registri, quindi tocchi Sì per salvare il file di registro sull'unità USB. I file analog.log e kss700.xml.log verranno salvati nell'unità USB.
-
Come si usa la denominazione interattiva dei file?
- Selezioni Impostazioni del dispositivo > Opzioni del dispositivo.
- Dalle opzioni di configurazione, selezioni Allow File Naming. Questo aggiungerà un'icona sulla Scan Station con la dicitura “Nome file.”
- Selezioni Salva per salvare il file di configurazione.
- Esporti il file di configurazione nel livello superiore di un'unità USB e verifichi che il nome del file sia kss.xml.
- Aggiorna la Scan Station: Può utilizzare l'unità USB (continuare con il passo successivo), oppure eseguire l'aggiornamento in remoto dal computer host.
- Inserisca l'unità USB nella Scan Station.
- Selezioni No ai prompt.
- Selezioni l'icona Nominazione dei file.
- Selezioni Avanzate.
- Seleziona Autorizza la denominazione dei file durante la scansione.
Nota: Se esegue questa procedura senza l'unità USB inserita nella Scan Station, le modifiche non saranno permanenti.
-
Come si usa il microfono della Scan Station?
Può utilizzare il microfono per creare annotazioni vocali da inviare via e-mail come allegato. Può anche inviare un file di annotazione vocale separato a qualsiasi destinazione, tranne che a una stampante.
-
Quali sono gli accessori disponibili per la Scan Station?
Per informazioni sugli accessori, clicchi qui. Selezioni la scheda Prodotti correlati, quindi Accessori.
-
Lavori: Che cos'è la modalità Jobs?
La modalità Lavori le consente di impostare una combinazione di impostazioni di scansione predefinite, destinazioni e gruppi di utenti. Un lavoro viene visualizzato come un pulsante sull'interfaccia utente della Scan Station e consente di eseguire una scansione one-touch. Dopo aver impostato un lavoro (o più lavori), solo il pulsante (o i pulsanti) del lavoro vengono visualizzati sulla Scan Station.
-
Che cos'è l'applicazione Amministrazione scanner?
L'applicazione Scanner Administration le consente di creare file di configurazione e di comunicare con i dispositivi Scan Station in rete; questa applicazione riduce al minimo la necessità di accedere individualmente a più Scan Station. Per configurare e lavorare con la Scan Station, deve installare l'applicazione Scanner Administration sul computer host. Nell'applicazione sono disponibili le seguenti schede:
- Scanner – consente di monitorare le stazioni di scansione scoperte e configurate, di caricare i file di configurazione, di aggiornare le informazioni sul dispositivo e di ottenere i file di registro da una specifica stazione di scansione.
- Configurazione – consente di creare e modificare i file di configurazione. Dopo aver creato almeno un file di configurazione, questa schermata visualizzerà un elenco di tutti i suoi file di configurazione.
-
Quali lingue supporta la Scan Station?
La Scan Station supporta le seguenti lingue: Inglese, francese, italiano, tedesco, spagnolo-internazionale, portoghese-brasiliano, olandese, ceco, russo, turco, polacco, greco, rumeno, ungherese, giapponese, coreano, cinese-semplificato e cinese-tradizionale.
-
Perché non posso inviare documenti scansionati via e-mail?
Segua questi passaggi:
- Verifichi che il suo server e-mail sia configurato correttamente. (Consulti la Guida per l'amministratore – “Configurazione delle impostazioni e-mail.”)
- Verificare che la destinazione e-mail sia impostata correttamente. (Vedere la Guida per l'amministratore – “Impostazione di una destinazione e-mail.”)
- Salvare la configurazione.
- Caricare il file di configurazione sulla Scan Station.
Risoluzione dei problemi
-
Se si verificano "Errori imprevisti" o avanzamenti multipli continui, esegua una calibrazione UDDS.
Guardi i seguenti video per eseguire una calibrazione UDDS.
Calibrazione UDDS per la versione 1.3.67 o successiva.
Calibrazione UDDS per le versioni precedenti alla 1.3.67
-
Perché la ricerca in Active Directory non funziona correttamente?
Segua questi passi:
- Impostare una connessione a Active Directory e verificare che sia possibile completare una “connessione di prova” con successo.
- Verifichi che sia selezionata la casella di controllo per Allow Email Search.
Mantenimento
-
Come si pulisce l'area di imaging?
1. Pulisca l'area di imaging superiore e inferiore con un panno Staticide. Faccia attenzione a non graffiare l'area di imaging durante la pulizia.
IMPORTANTE: le salviette Staticide contengono isopropanolo che può causare irritazione agli occhi e secchezza della pelle. Si lavi le mani con acqua e sapone dopo aver eseguito le procedure di manutenzione. Per ulteriori informazioni, consulti la scheda di sicurezza.
2. Pulisca di nuovo l'area di imaging superiore e inferiore utilizzando il tampone per la pulizia dell'ottica riutilizzabile per rimuovere eventuali striature.
3. Al termine, chiuda il coperchio della Scan Station con entrambe le mani
-
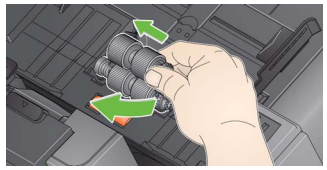
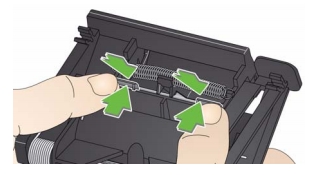
Come posso pulire i rulli?
1. Apra il coperchio della Stazione di scansione.
2. Con un tampone per la pulizia dei rulli, pulire i rulli di alimentazione da un lato all'altro. Ruoti i rulli di alimentazione per pulire l'intera superficie.
IMPORTANTE: Il tampone per la pulizia del rullo contiene sodio lauriletere lauriletere di sodio, che può causare irritazione agli occhi. Si lavi le mani con acqua e sapone dopo aver eseguito le procedure di manutenzione. manutenzione. Per ulteriori informazioni, consulti la scheda MSDS (Material Safety Data Sheet) per maggiori informazioni.
3. Asciughi i rulli con un panno che non lasci residui.
-
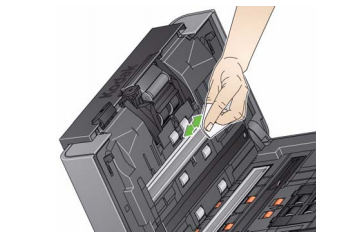
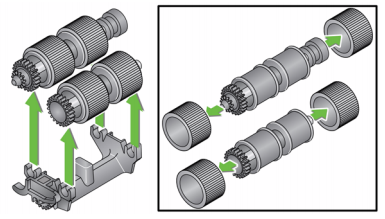
Come si sostituiscono il modulo di alimentazione e gli pneumatici?
NOTA: il sensore di presenza carta si trova a sinistra del modulo di alimentazione. Faccia attenzione a non danneggiare il sensore di presenza carta quando rimuove o pulisce il modulo di alimentazione.
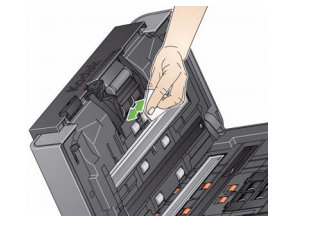
1. Tiri contro il bordo rialzato del coperchio del modulo di alimentazione e lo sollevi e lo faccia uscire dalla sua posizione.
2. Ruoti il modulo di alimentazione in avanti e lo spinga verso sinistra per sollevarlo dalla posizione.
Se sta sostituendo il modulo di alimentazione, inserisca il nuovo modulo di alimentazione allineando i perni e spingendolo verso sinistra per farlo entrare in posizione. Si assicuri che gli ingranaggi siano allineati e che scatti in posizione, quindi passi al Passo 8.
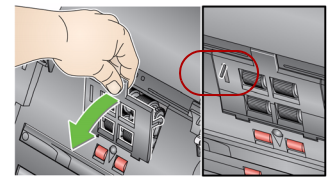
Se sta sostituendo gli pneumatici, continui con il Passaggio 3.
3. Rimuova un gruppo centrale sollevandolo e facendolo uscire dalla sua posizione.
4. Rimuova ogni pneumatico facendo scorrere il pneumatico dal nucleo.
5. Installi ogni nuovo pneumatico tirandolo delicatamente sul nucleo. IMPORTANTE: non tenda eccessivamente il pneumatico; potrebbe strapparsi.
6. Rimetta il gruppo del nucleo nel modulo di alimentazione. Potrebbe essere necessario far scorrere l'albero a destra o a sinistra, in modo che il nucleo si inserisca correttamente nell'alloggiamento del modulo di alimentazione.
7. Ripeta la procedura di sostituzione descritta sopra per l'altro gruppo centrale.
8. Reinstalli il modulo di alimentazione allineando i perni e spingendolo verso sinistra per inserirlo in posizione.
9. Reinstalli il coperchio del modulo di alimentazione allineando le linguette nelle fessure e spingendo il coperchio del modulo di alimentazione verso il basso finché non scatta in posizione.
-
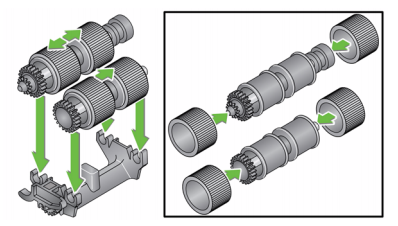
Come si sostituisce il cuscinetto di pre-separazione?
1. Rimuova il modulo di separazione dalla Scan Station seguendo i passaggi precedentemente descritti in “Sostituzione del modulo di separazione e degli pneumatici”.
2. Tenga il modulo di separazione con entrambe le mani e individui le due linguette che sporgono leggermente dal retro del modulo di separazione.
3. Spinga verso il basso le linguette finché il cuscinetto di pre-separazione non sporge leggermente dalla parte anteriore del modulo di separazione.
4. Afferri il cuscinetto di pre-separazione e lo estragga dal modulo di separazione.
5. Gettare il tampone di pre-separazione usurato.
6. Allinei le linguette laterali di un nuovo cuscinetto di pre-separazione con le fessure sul modulo di separazione.
7. Spinga con forza il cuscinetto di pre-separazione nelle fessure fino a quando l'aletta del cuscinetto di pre-separazione poggia leggermente contro le gomme del modulo di separazione.
8. Reinstalli il modulo di separazione allineando le linguette con le fessure e facendolo scattare in posizione.
-
Cosa posso fare per evitare che la carta si inceppi?
Per informazioni sulla prevenzione degli inceppamenti della carta, consulti i capitoli 11 e 12 della Guida per l'amministratore.
-
Quali sono le forniture e i materiali di consumo disponibili per gli scanner KODAK?
Per informazioni sui materiali disponibili, consulti il Catalogo delle Forniture e dei Materiali di Consumo per gli Scanner KODAK