Scan Station 730EX FAQs
Below are the frequently asked questions for the Scan Station 730EX.
Select another product by typing the name in the field below.
設置方法
-
スキャンステーションのセットアップに使用するホストコンピュータで互換性のあるオペレーティングシステムは何ですか?
スキャンステーションで使用するスキャナ管理アプリケーションには、ホストコンピュータに次のオペレーティングシステムのいずれかとMICROSOFT .Net 4.0 Frameworkがインストールされている必要があります(検出されない場合、このプログラムは自動的にインストールされます)。
- Windows10
- ウィンドウズ 8
- WINDOWS 7
-
スキャナ管理アプリケーションのインストーラが実行されません。
ホストコンピュータにアプリケーションをインストールするには、管理者権限が必要です。
- 管理者権限と管理者パスワードがあることを確認してください。(インストーラ ファイルを右クリックし、管理者として実行を選択し、プロンプトに従ってください。)
- アンチウイルスソフトウェアを確認してください。このソフトウェアがアプリケーションの実行をブロックしている可能性があります。
使用
-
ジョブズ作成後に設定を変更することはできますか?
ジョブ設定はスキャナ管理アプリケーションを使用して変更します。ジョブが定義され、設定がスキャンステーションにアップロードされると、スキャンステーションにはジョブ画面のみが表示されます(通常のユーザーインターフェースは表示されません)
-
Can I switch back to the manual mode after I set up Jobs?
You can access the manual mode after you remove all entries for Jobs in the configuration file (using the Scanner Administration Application). Or, you can also access the manual mode after inserting a USB drive that contains the configuration file (kss.xml). The configuration file can be exported from the Scanner Administration Application and must be named “kss.xml”. This file must also be located at the root (top) level of the USB drive.
-
スキャンステーションの設定や使用にはパソコンが必要ですか?
スキャンステーションを使用するのにコンピュータは必要ありませんが、設定ファイルを作成したり、スキャナ管理アプリケーションをインストールして使用するにはコンピュータが必要です。スキャンステーションの設定には2つの方法があります。
- ホスト(リモート)コンピュータからスキャナ管理アプリケーションを使用
- 設定ファイル(kss.xml)をUSBドライブにコピーし、USBドライブをスキャンステーションに挿入します。設定ファイルはスキャナ管理アプリケーションからエクスポートでき、「kss.xml」という名 前である必要があります。 また、このファイルは USB ドライブのルート(最上位)レベルに配置する必要があります。
-
スキャンステーションにはUSBとイーサネットポートがありますか?
はい、Scan Station 700シリーズには4つのUSBポートと1つのイーサネットポートがあります。USBポートは、USBメモリへのファイル保存、管理者設定へのアクセス、スキャンステーションの設定、USBキーボードの接続に使用します。
-
スキャンステーションのファームウェアバージョンとオペレーティングシステム(OS)はどのように確認できますか?
この情報を見つけるには2つの方法があります:
- スキャンステーションで、アイコンをタッチします。
- ホストコンピュータで、スキャナ管理アプリケーションを開きます。グリッドからスキャナを選択し、アイコンをクリックします。
-
スキャナに関する専門的なサービスやサポートを受けるにはどうすればよいですか?
コダック Alaris サポートへのお問い合わせ方法については、コダック Alaris サービスおよびサポートをご覧ください。
-
-
スキャンステーションの設定を工場出荷時の設定に戻す方法を教えてください。
- 設定ファイルをUSBドライブの最上位にコピーし、ファイル名がkss.xmlであることを確認します。
- USBドライブをスキャンステーションに挿入します。
- No を選択します。
- スキャンステーションアイコンを選択します。
- セットアップウィザードの開始を選択します。
- ウィザードを開始するまたは次の再起動時にセットアップウィザードを実行するを選択します。
- USBドライブを取り外します。
コンフィギュレーション設定をリセットするには:
- デフォルト設定ファイルを作成します。
- 設定ファイルをスキャンステーションにアップロードしてください。
-
エラーログファイルの保存方法を教えてください。
問題を診断するために、サービス担当者からログファイルの提出を求められることがあります。ログファイルは、電子メールに添付して送信できます。
ログファイルを入手するには、次の2つの方法があります。
スキャナ管理アプリケーションを使用する方法:- ホストコンピュータでスキャナ管理アプリケーションを開きます。
- [スキャナー]タブをクリックします。
- スキャナ >デバイスを選択し、「すべてのログを保存...」を選択します。
- ファイルを保存します。
USBドライブを使用する場合
- 設定ファイルを作成し、使用していないUSBドライブに保存します。ファイル名が kss.xml.
- USBドライブをスキャンステーションのUSBポートに挿入してください。
- No を選択してください。
- スキャンステーションに設定アイコンが表示されます。
- 矢印を使って診断(レンチアイコン)までスクロールします。アイコンを選択します。
- Save Logs を選択し、YesをタッチしてログファイルをUSBドライブに保存します。analog.log と kss700.xml.log ファイルが USB ドライブに保存されます。
-
インタラクティブなファイル名の付け方を教えてください。
- デバイス設定 > デバイスオプションを選択します。
- 設定オプションから、ファイル名を付けるを選択します。これにより、スキャンステーション上に「ファイル命名」と書かれたアイコンが追加されます。
- 保存を選択し、設定ファイルを保存します。
- 設定ファイルをUSBドライブの最上位にエクスポートし、ファイル名がkss.xmlであることを確認してください。
- スキャンステーションを更新します: USBドライブを使用するか(次のステップに進む)、ホストコンピュータからリモートでアップデートを行うことができます。
- USBドライブをスキャンステーションに挿入します。
- 表示されるプロンプトでNoを選択します。
- ファイル名アイコンを選択します。
- 詳細を選択します。
- スキャン中にファイル名付けを許可するを選択します。
注意:USBドライブをスキャンステーションに挿入せずにこの手順を実行した場合、変更は永続的ではありません。
-
スキャンステーションのマイクの使い方は?
マイクを使って音声注釈を作成し、電子メールに添付して送信できます。また、別の音声注釈ファイルをプリンタ以外の宛先に送信することもできます。
-
スキャンステーションにはどのようなアクセサリーがありますか?
アクセサリーについては、こちらをクリックしてください。関連商品タブを選択し、アクセサリーを選択してください。
-
ジョブズ ジョブズ・モードとは何ですか?
ジョブモードでは、事前に定義されたスキャン設定、宛先、ユーザーグループの組み合わせを設定できます。ジョブはスキャンステーションのユーザーインターフェースにボタンとして表示され、ワンタッチでスキャンできます。ジョブ(または複数のジョブ)を設定すると、スキャンステーションにはジョブボタンのみが表示されます。
-
スキャナ管理アプリケーションとは何ですか?
スキャナ管理アプリケーションを使用すると、設定ファイルを作成したり、ネッ トワーク上のスキャンステーションデバイスと通信したりできます。スキャンステーションのセットアップや作業を行うには、ホストコンピュータに Scanner Administration アプリケーションをインストールする必要があります。このアプリケーションでは、以下のタブが使用できます:
- スキャナ –検出され設定されたスキャンステーションを監視し、設定ファイルをアップロードし、デバイス情報を更新し、特定のスキャンステーションからログファイルを取得することができます。
- コンフィギュレーション –ではコンフィギュレーションファイルの作成と変更ができます。最低1つの設定ファイルを作成すると、この画面にすべての設定ファイルのリストが表示されます。
-
スキャンステーションはどの言語に対応していますか?
スキャンステーションは以下の言語に対応しています: 英語、フランス語、イタリア語、ドイツ語、スペイン語-インターナショナル、ポルトガル語-ブラジル、オランダ語、チェコ語、ロシア語、トルコ語、ポーランド語、ギリシャ語、ルーマニア語、ハンガリー語、日本語、韓国語、中国語-簡体字、中国語-繁体字。
-
スキャンした文書を電子メールで送信できないのはなぜですか?
以下の手順に従ってください。
- 電子メールサーバーが正しく設定されていることを確認します。(管理者ガイドを参照してください。
- 電子メールの宛先が正しく設定されていることを確認します。(管理者ガイド「電子メール送信先の設定」を参照)
- 設定を保存します。
- 設定ファイルをScan Stationにアップロードします。
トラブルシューティング
-
予期せぬエラー」や連続マルチフィードが発生した場合は、UDDSキャリブレーションを実施してください。
UDDSキャリブレーションを行うには、以下のビデオをご覧ください。.
UDDSキャリブレーション(バージョン1.3.67以前用)
-
Active Directoryの検索がうまくいきません。
以下の手順に従ってください。
- アクティブ・ディレクトリ接続をセットアップし、テスト接続が正常に完了することを確認します。
- メール検索を許可するのチェックボックスが選択されていることを確認します。
維持
-
撮像エリアのクリーニング方法を教えてください。
1. Staticide wipeを使用して上下のイメージングエリアを拭きます。クリーニングの際、イメージングエリアに傷をつけないように注意してください。
重要: Staticideワイプにはイソプロパノールが含まれています。メンテナンス作業を行った後は、石鹸と水で手を洗ってください。詳細については、MSDSを参照してください。
2.再使用可能な光学クリーナーパッドを使用して、上部および下部の画像領域をもう一度拭き、筋を取り除きます。
3.終わったら、スキャンステーションのカバーを両手で閉じてください。
-
ローラーの清掃方法は?
1. スキャンステーションのカバーを開けてください。
2.ローラークリーニングパッドで、フィードローラを左右に拭きます。 フィードローラーを回転させて、表面全体をクリーニングします。
重要:ローラークリーニングパッドにはラウリルエーテル硫酸ナトリウムが含まれています。 が含まれています。メンテナンス を石鹸と水で洗ってください。 てください。詳細については、MSDS (製品安全データシート) を参照してください。 シート)を参照してください。
3.糸くずの出ない布でローラーを乾かします。
-
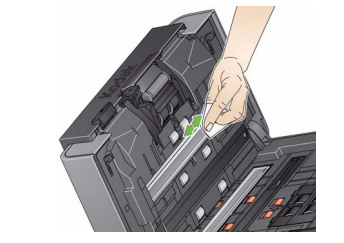
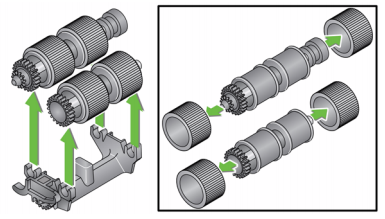
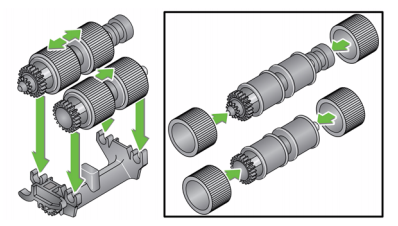
フィードモジュールとタイヤの交換方法を教えてください。
注意:現在紙センサーはフィードモジュールの左側にあります。給紙モジュール周辺を取り外したり清掃したりするときは、用紙センサーを傷つけないように注意してください。
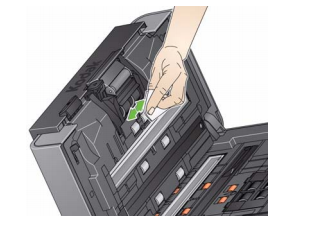
1. フィードモジュールカバーの縁を引っ張り、持ち上げて位置から外します。
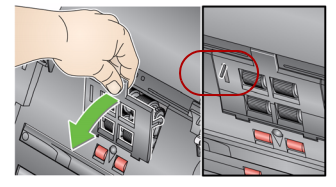
2.フィードモジュールを前方に回転させ、左側に押して位置を持ち上げます。
フィードモジュールを交換する場合は、ピンを合わせて新しいフィードモジュールを挿入し、左方向に押して所定の位置に合わせます。ギアの位置が合っていることを確認し、所定の位置にはめ込んだら、ステップ8へ進みます。
タイヤを交換する場合は、ステップ3に進んでください。
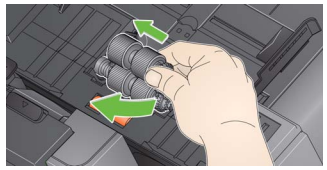
3.コアアセンブリーを1つ、持ち上げて外します。
4. タイヤをコアからスライドさせて外します。
5. 5.新しいタイヤをコアの上に軽く引っ張りながら取り付けます。重要:タイヤを無理に引っ張らないでください。
6. コア・アセンブリをフィード・モジュールに戻します。コアがフィードモジュールのハウジング内に正しく収まるように、シャフトを左右にスライドさせる必要があるかもしれません。
7.もう一方のコアアセンブリについても、上記の交換手順を繰り返します。
8.ピンを合わせてフィードモジュールを再度取り付け、左方向に押して所定の位置に合わせます。
9. タブをスロットに合わせ、カチッと音がするまでフィードモジュールカバーを押し下げて、フィードモジュールカバーを再度取り付けます。
-
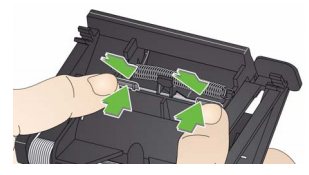
プレセパレーションパッドの交換方法を教えてください。
1. 分離モジュールとタイヤの交換」で説明した手順で、スキャンステーションから分離モジュー ルを取り外します。
2.分離モジュールを両手で持ち、分離モジュールの背面からわずかに突き出ている2つのタブを探します。
3.分離モジュールの前面から分離前パッドが少し出るまで、タブを押し下げます。
4.分離前パッドをつかみ、分離モジュールから引き抜きます。
5. 磨耗したプレセパレーションパッドを廃棄します。
6.新しい分離前パッドのサイドタブを分離モジュールのスロットに合わせます。
7.プレセパレーションパッドのフラップが分離モジュールのタイヤに軽く当たるまで、プレセパレーションパッドをスロットにしっかりと押し込みます。
8.タブをスロットに合わせ、所定の位置にはめ込んで、分離モジュールを再び取り付けます
。
-
紙詰まりを防ぐにはどうしたらいいですか?
- 紙詰まりの防止については、『管理者ガイド』の第 11 章と第 12 章を参照してください。
-
Kodak Alarisスキャナーでは、どのような供給品および消耗品を利用できますか?
- すべてのKodak Alarisスキャナーで利用できる供給品および消耗品の詳しいリストについては、『供給品および消耗品ガイド』を参照してください。