Scan Station 730EX FAQs
Below are the frequently asked questions for the Scan Station 730EX.
Select another product by typing the name in the field below.
Instalacja
-
Jakie systemy operacyjne są kompatybilne z komputerem hosta używanym do konfiguracji Scan Station?
Aplikacja Scanner Administration używana ze Scan Station wymaga, aby komputer hosta miał jeden z następujących systemów operacyjnych i zainstalowany MICROSOFT .Net 4.0 Framework (program ten zostanie automatycznie zainstalowany, jeśli nie zostanie wykryty).
- WINDOWS 10
- WINDOWS 8
- WINDOWS 7
-
Dlaczego instalator aplikacji Scanner Administration nie uruchamia się?
Aby zainstalować aplikację na komputerze hosta, muszą Państwo posiadać uprawnienia administratora.
- Proszę sprawdzić, czy mają Państwo uprawnienia administracyjne i hasło administratora. (Proszę kliknąć prawym przyciskiem myszy na plik instalatora, wybrać Uruchom jako administrator, a następnie postępować zgodnie z instrukcjami).
- Sprawdzić oprogramowanie antywirusowe; oprogramowanie to może blokować uruchomienie aplikacji.
Używanie
-
Czy mogę zmienić ustawienia po utworzeniu zadań?
Ustawienia zadań są modyfikowane za pomocą aplikacji Scanner Administration. Po zdefiniowaniu zadania i przesłaniu konfiguracji do stacji Scan Station, na stacji Scan Station zostanie wyświetlony tylko ekran zadań (normalny interfejs użytkownika nie zostanie wyświetlony)
-
Can I switch back to the manual mode after I set up Jobs?
You can access the manual mode after you remove all entries for Jobs in the configuration file (using the Scanner Administration Application). Or, you can also access the manual mode after inserting a USB drive that contains the configuration file (kss.xml). The configuration file can be exported from the Scanner Administration Application and must be named “kss.xml”. This file must also be located at the root (top) level of the USB drive.
-
Czy potrzebuję komputera, aby skonfigurować i używać Scan Station?
Komputer nie jest potrzebny do korzystania z aplikacji Scan Station; komputer jest jednak potrzebny do utworzenia pliku konfiguracyjnego oraz zainstalowania i korzystania z aplikacji Scanner Administration. Istnieją dwie metody konfiguracji Scan Station:
- Użycie aplikacji Scanner Administration z komputera hosta (zdalnego)
- Kopiowanie pliku konfiguracyjnego (kss.xml) na dysk USB i włożenie dysku USB do stacji Scan Station. Plik konfiguracyjny można wyeksportować z aplikacji Scanner Administration i musi on mieć nazwę "kss.xml". Plik ten musi również znajdować się na głównym (górnym) poziomie napędu USB.
-
Czy stacja skanująca posiada porty USB i Ethernet?
Tak, Scan Station serii 700 posiada cztery porty USB i jeden port Ethernet. Porty USB służą do zapisywania plików na dysku USB, uzyskiwania dostępu do ustawień administratora, konfigurowania skanera Scan Station i podłączania klawiatury USB.
-
Jak mogę określić wersję oprogramowania sprzętowego i systemu operacyjnego stacji skanującej?
Istnieją dwa sposoby na znalezienie tych informacji:
- Na stacji Scan Station proszę dotknąć ikony.
- Na komputerze hosta proszę otworzyć aplikację Scanner Administration. Proszę wybrać skaner z siatki i kliknąć ikonę.
-
Jak mogę uzyskać profesjonalne usługi i wsparcie dla skanera?
W celu uzyskania informacji o tym, jak skontaktować się z pomocą techniczną Kodak Alaris, proszę odwiedzić Kodak Alaris Services and Support.
-
-
Jak zresetować ustawienia (Scan Station) do domyślnych ustawień fabrycznych?
- Proszę skopiować plik konfiguracyjny na najwyższy poziom napędu USB i sprawdzić, czy nazwa pliku to kss.xml.
- Proszę włożyć napęd USB do stacji Scan Station.
- Proszę wybrać opcję Nie w odpowiedzi na monity.
- Proszę wybrać ikonę Scan Station.
- Proszę wybrać Uruchom kreatora konfiguracji.
- Proszę wybrać Uruchom kreatora lub Uruchom kreatora konfiguracji przy następnym ponownym uruchomieniu.
- Proszę usunąć napęd USB.
Aby zresetować ustawienia konfiguracji:
- Proszę utworzyć domyślny plik konfiguracyjny.
- Przesłać plik konfiguracyjny do Scan Station.
-
Jak zapisać pliki dziennika błędów?
Personel serwisowy może poprosić Państwa o dostarczenie plików dziennika w celu zdiagnozowania problemu. Mogą Państwo wysłać pliki dziennika jako załącznik do wiadomości e-mail.
Istnieją dwa sposoby uzyskania plików dziennika:
Za pomocą aplikacji Scanner Administration:- Otworzyć aplikację Scanner Administration na komputerze hosta.
- Kliknąć zakładkę Skanery.
- Proszę wybrać Scanners > Device, a następnie wybrać "Save all logs...".
- Zapisz plik(i).
Korzystanie z napędu USB:
- Proszę utworzyć plik konfiguracyjny i zapisać go na nieużywanym napędzie USB. Proszę sprawdzić, czy nazwa pliku to kss.xml.
- Podłącz napęd USB do portu USB stacji Scan Station.
- Proszę wybrać - Nie w odpowiedzi na monity.
- Scan Station wyświetli ikony ustawień.
- Użyć strzałek, aby przewinąć do Diagnostics (ikona klucza). Proszę wybrać ikonę.
- Proszę wybrać Zapisz dzienniki, a następnie dotknąć Tak, aby zapisać plik dziennika na dysku USB. Pliki analog.log i kss700.xml.log zostaną zapisane na dysku USB.
-
Jak używać interaktywnego nazewnictwa plików?
- Proszę wybrać Ustawienia urządzenia > Opcje urządzenia.
- W opcjach konfiguracji proszę wybrać Allow File Naming. Spowoduje to dodanie ikony na Scan Station oznaczonej “File Naming.”
- Proszę wybrać Zapisz, aby zapisać plik konfiguracyjny.
- Proszę wyeksportować plik konfiguracyjny na najwyższy poziom dysku USB i sprawdzić, czy nazwa pliku to kss.xml.
- Zaktualizować Scan Station: Można użyć napędu USB (proszę przejść do następnego kroku) lub przeprowadzić aktualizację zdalnie z komputera hosta.
- Proszę włożyć napęd USB do stacji Scan Station.
- Proszę wybrać Nie w odpowiedzi na monity.
- Proszę wybrać ikonę Nazwa pliku.
- Proszę wybrać Zaawansowane.
- Proszę wybrać Allow File Naming During Scan.
Uwaga: Jeśli wykonają Państwo tę procedurę bez napędu USB włożonego do Scan Station, zmiany nie będą trwałe.
-
Jak korzystać z mikrofonu stacji skanującej?
Mikrofonu można używać do tworzenia adnotacji głosowych, które można wysyłać pocztą e-mail jako załącznik. Można również wysłać oddzielny plik adnotacji głosowej do dowolnego miejsca docelowego z wyjątkiem drukarki.
-
Jakie akcesoria są dostępne dla Scan Station?
Aby uzyskać informacje na temat akcesoriów, proszę kliknąć tutaj. Proszę wybrać zakładkę Powiązane produkty, a następnie Akcesoria.
-
Praca: Czym jest tryb Jobs?
Tryb zadań umożliwia skonfigurowanie kombinacji predefiniowanych ustawień skanowania, miejsc docelowych i grup użytkowników. Zadanie jest wyświetlane jako przycisk na interfejsie użytkownika skanera Scan Station i umożliwia skanowanie jednym dotknięciem. Po skonfigurowaniu zadania (lub zadań) na stacji skanującej wyświetlane są tylko przyciski zadań.
-
Czym jest aplikacja Scanner Administration?
Aplikacja Scanner Administration umożliwia tworzenie plików konfiguracyjnych i komunikację z urządzeniami Scan Station w sieci; aplikacja ta minimalizuje potrzebę indywidualnego dostępu do wielu stacji Scan Station. Aby skonfigurować stację Scan Station i pracować z nią, należy zainstalować aplikację Scanner Administration na komputerze hosta. W aplikacji dostępne są następujące karty:
- Scanner – pozwala monitorować wykryte i skonfigurowane stacje skanujące, przesyłać pliki konfiguracyjne, aktualizować informacje o urządzeniu i uzyskiwać pliki dziennika z określonej stacji skanującej.
- Konfiguracja – umożliwia tworzenie i modyfikowanie plików konfiguracyjnych. Po utworzeniu co najmniej jednego pliku konfiguracyjnego na tym ekranie zostanie wyświetlona lista wszystkich plików konfiguracyjnych.
-
Jakie języki obsługuje Scan Station?
Scan Station obsługuje następujące języki: Angielski, francuski, włoski, niemiecki, hiszpański - międzynarodowy, portugalski - brazylijski, holenderski, czeski, rosyjski, turecki, polski, grecki, rumuński, węgierski, japoński, koreański, chiński uproszczony i chiński tradycyjny.
-
Dlaczego nie mogę wysyłać zeskanowanych dokumentów na e-mail?
Proszę wykonać następujące kroki:
- Sprawdzić, czy serwer poczty e-mail jest prawidłowo skonfigurowany. (Proszę zapoznać się z Podręcznikiem administratora – “Konfigurowanie ustawień poczty e-mail.”)
- Sprawdzić, czy miejsce docelowe poczty e-mail jest poprawnie skonfigurowane. (Proszę zapoznać się z Podręcznikiem administratora – “Konfigurowanie miejsca docelowego poczty e-mail.”)
- Zapisz konfigurację.
- Przesłać plik konfiguracyjny do Scan Station.
Rozwiązywanie problemów
-
W przypadku wystąpienia "Nieoczekiwanych błędów" lub ciągłego podawania wielokrotnego należy wykonać kalibrację UDDS.
Obejrzyj poniższe filmy, aby wykonać kalibrację UDDS.
Kalibracja UDDS dla wersji 1.3.67 lub nowszej.
Kalibracja UDDS dla wersji wcześniejszych niż 1.3.67
-
Dlaczego wyszukiwanie w usłudze Active Directory nie działa prawidłowo?
Prosimy wykonać następujące kroki:
- Proszę skonfigurować połączenie z usługą Active Directory i sprawdzić, czy można pomyślnie wykonać “połączenie testowe”
- Sprawdzić, czy pole wyboru Zezwalaj na wyszukiwanie poczty e-mail jest zaznaczone.
Utrzymanie
-
Jak wyczyścić obszar obrazowania?
1. Przetrzeć górny i dolny obszar obrazowania ściereczką Staticide. Proszę uważać, aby nie zarysować obszaru obrazowania podczas czyszczenia.
WAŻNE: Chusteczki Staticide zawierają izopropanol, który może powodować podrażnienie oczu i wysuszenie skóry. Proszę umyć ręce wodą z mydłem po wykonaniu procedur konserwacyjnych. Proszę zapoznać się z kartą charakterystyki substancji niebezpiecznej (MSDS), aby uzyskać więcej informacji.
2. Proszę ponownie przetrzeć górny i dolny obszar obrazowania za pomocą podkładki wielokrotnego użytku do czyszczenia optyki, aby usunąć wszelkie smugi.
3. Po zakończeniu proszę zamknąć pokrywę Scan Station obiema rękami
-
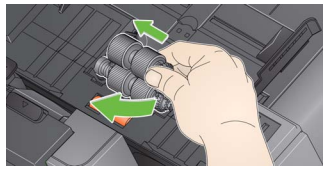
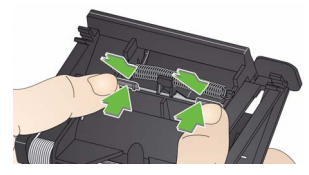
Jak czyścić rolki?
1. Proszę otworzyć pokrywę stacji skanowania.
2. Za pomocą podkładki do czyszczenia rolek przetrzeć rolki podające z boku na bok. Obrócić rolki podające, aby wyczyścić całą powierzchnię.
WAŻNE: Rolkowy pad czyszczący zawiera lauryloeterosiarczan sodu, który może powodować podrażnienie oczu. który może powodować podrażnienie oczu. Proszę umyć ręce wodą z mydłem po wykonaniu procedur konserwacyjnych. Więcej informacji można znaleźć w karcie charakterystyki Arkusz bezpieczeństwa materiału), aby uzyskać więcej informacji.
3. Proszę osuszyć rolki niestrzępiącą się ściereczką.
-
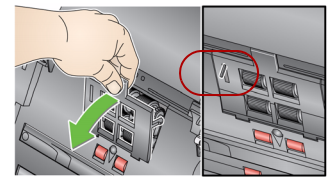
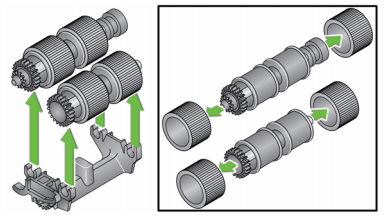
Jak wymienić moduł zasilający i opony?
UWAGA: Czujnik obecności papieru znajduje się po lewej stronie modułu podawania. Należy uważać, aby nie uszkodzić czujnika obecności papieru podczas wyjmowania lub czyszczenia wokół modułu podawania.
1. Pociągnąć za podniesioną krawędź pokrywy modułu podawania i podnieść ją do góry i wysunąć.
2. Proszę obrócić moduł podawania do przodu i popchnąć go w lewo, aby go podnieść.
W przypadku wymiany modułu podawania należy włożyć nowy moduł podawania, wyrównując sworznie i popychając go w lewo, aby dopasować go do pozycji. Upewnić się, że koła zębate są wyrównane i zatrzasnęły się na miejscu, a następnie przejść do kroku 8.
Jeśli wymieniają Państwo opony, proszę kontynuować od kroku 3.
3. Proszę wyjąć jeden zespół rdzenia, podnosząc go i wysuwając z pozycji.
4. Zdjąć każdą oponę, zsuwając ją z rdzenia.
5. Zamontować każdą nową oponę, delikatnie naciągając ją na rdzeń. WAŻNE: Proszę nie naciągać opony zbyt mocno; może się rozerwać.
6. Włożyć zespół rdzenia do modułu podającego. Konieczne może być przesunięcie wału w prawo lub w lewo, aby rdzeń prawidłowo pasował do obudowy modułu podającego.
Proszę powtórzyć procedurę wymiany opisaną powyżej dla drugiego zespołu rdzenia.
8. Ponownie zainstalować moduł podawania, wyrównując sworznie i popychając go w lewo, aby dopasować go do pozycji.
9. Ponownie zainstalować pokrywę modułu podawania, wyrównując wypustki w szczelinach i popychając pokrywę modułu podawania w dół, aż zatrzaśnie się na swoim miejscu.
-
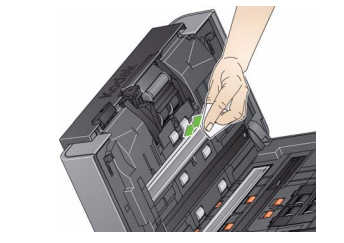
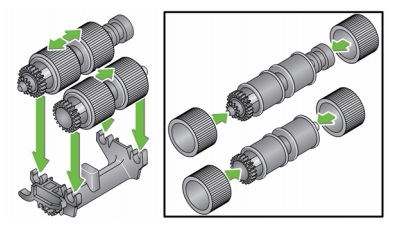
Jak wymienić podkładkę wstępną?
1. Proszę wyjąć moduł separacji ze stacji skanowania, wykonując czynności opisane wcześniej w “Wymiana modułu separacji i opon”.
2. Przytrzymać moduł separacji w obu rękach i zlokalizować dwie wypustki, które lekko wystają z tyłu modułu separacji.
3. Nacisnąć wypustki w dół, aż podkładka do wstępnej separacji będzie lekko wystawać z przodu modułu separacji.
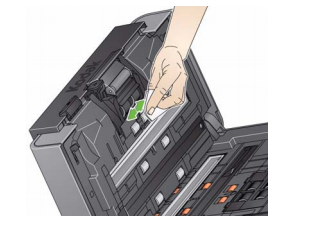
4. Proszę chwycić podkładkę wstępnego oddzielania i wyciągnąć ją z modułu oddzielania.
5. Proszę wyrzucić zużytą podkładkę wstępną.
6. Proszę wyrównać boczne wypustki nowej podkładki wstępnej separacji ze szczelinami na module separacji.
7. Mocno wcisnąć podkładkę wstępnego oddzielania w szczeliny, aż klapka podkładki wstępnego oddzielania lekko oprze się o opony modułu separacji.
8. Ponownie zamontować moduł separujący, wyrównując wypustki ze szczelinami i zatrzaskując go na miejscu.
-
Co mogę zrobić, aby zapobiec zacięciom papieru?
- Aby uzyskać informacje na temat zapobiegania zacięciom papieru, proszę zapoznać się z Rozdziałem 11 i 12 Podręcznika administratora.
-
Jakie materiały eksploatacyjne są dostępne dla skanerów KODAK?
W celu uzyskania informacji o dostępnych materiałach, proszę zapoznać się z Katalogiem materiałów eksploatacyjnych dla skanerów KODAK