Scan Station 730EX FAQs
Below are the frequently asked questions for the Scan Station 730EX.
Select another product by typing the name in the field below.
Instalação
-
Quais sistemas operacionais são compatíveis com o computador host usado para configurar o Scan Station?
O aplicativo Scanner Administration usado com Scan Station requer que o computador host tenha um dos seguintes sistemas operacionais e a estrutura MICROSOFT .Net 4.0 instalada (esse programa será instalado automaticamente se não for detectado).
- WINDOWS 10
- WINDOWS 8
- WINDOWS 7
-
Por que o instalador do aplicativo Scanner Administration não é executado?
O senhor deve ter direitos administrativos para instalar o aplicativo no computador host.
- Verifique se o senhor tem direitos administrativos e a senha de administrador. (Clique com o botão direito do mouse no arquivo do instalador, selecione Executar como administrador e siga as instruções.)
- Verifique seu software antivírus; esse software pode impedir a execução de um aplicativo.
Usando
-
Posso alterar as configurações depois de criar os trabalhos?
As configurações de trabalho são modificadas usando o Aplicativo de administração do scanner. Depois que uma tarefa tiver sido definida e a configuração tiver sido carregada no Scan Station, somente a tela Tarefas será exibida no Scan Station (a interface de usuário normal não será exibida)
-
Can I switch back to the manual mode after I set up Jobs?
You can access the manual mode after you remove all entries for Jobs in the configuration file (using the Scanner Administration Application). Or, you can also access the manual mode after inserting a USB drive that contains the configuration file (kss.xml). The configuration file can be exported from the Scanner Administration Application and must be named “kss.xml”. This file must also be located at the root (top) level of the USB drive.
-
Preciso de um computador para configurar e usar o Scan Station?
O senhor não precisa de um computador para usar o Scan Station; no entanto, precisa de um computador para criar um arquivo de configuração e para instalar e usar o aplicativo Scanner Administration. Há dois métodos para configurar o Scan Station:
- Usando o aplicativo Scanner Administration a partir de um computador host (remoto)
- Copiando o arquivo de configuração (kss.xml) em uma unidade USB e inserindo a unidade USB no Scanner Station. O arquivo de configuração pode ser exportado do Aplicativo de administração do scanner e deve ser nomeado "kss.xml". Esse arquivo também deve estar localizado no nível da raiz (superior) da unidade USB.
-
O Scan Station tem portas USB e Ethernet?
Sim, o Scan Station série 700 tem quatro portas USB e uma porta Ethernet. As portas USB são usadas para armazenar arquivos em um pen drive, acessar as configurações do administrador, configurar o Scan Station e conectar um teclado USB.
-
Como posso determinar a versão do firmware e o sistema operacional (SO) do Scan Station?
Há duas maneiras de encontrar essas informações:
- No Scan Station, toque no ícone.
- No computador host, abra o aplicativo Scanner Administration. Selecione o scanner na grade e clique no ícone.
-
Como posso obter serviços profissionais e suporte para o scanner?
Para obter informações sobre como entrar em contato com o suporte da Kodak Alaris, visite Kodak Alaris Services and Support.
-
-
Como faço para redefinir as configurações (Scan Station) para os padrões de fábrica?
- Copie o arquivo de configuração para o nível superior de uma unidade USB e verifique se o nome do arquivo é kss.xml.
- Insira a unidade USB no Scan Station.
- Selecione No nos prompts.
- Selecione o ícone Scan Station.
- Selecione Iniciar assistente de configuração.
- Selecione Iniciar o assistente ou Executar o assistente de configuração na próxima reinicialização.
- Remova a unidade USB.
Para redefinir as definições de configuração:
- Crie um arquivo de configuração padrão.
- Faça o upload do arquivo de configuração para o Scan Station.
-
Como faço para salvar os arquivos de log de erros?
Pode ser solicitado pelo pessoal de serviço que o senhor forneça arquivos de registro para ajudar a diagnosticar um problema. O senhor pode enviar arquivos de log como anexo de um e-mail.
Há duas maneiras de obter arquivos de registro:
Usando o aplicativo de administração do scanner:- Abra o aplicativo Scanner Administration no computador host.
- Clique na guia Scanners.
- Selecione Scanners > Device e, em seguida, selecione "Save all logs...".
- Salve o(s) arquivo(s).
Usando uma unidade USB:
- Crie um arquivo de configuração e salve-o em uma unidade USB não utilizada. Verifique se o nome do arquivo é kss.xml.
- Insira a unidade USB em uma porta USB do Scan Station.
- Selecione - No para os prompts.
- O Scan Station exibirá os ícones de configuração.
- Use as setas para rolar até Diagnostics (o ícone de chave inglesa). Selecione o ícone.
- Selecione Save Logs e, em seguida, toque em Yes para salvar o arquivo de registro na unidade USB. Os arquivos analog.log e kss700.xml.log serão salvos na unidade USB.
-
Como faço para usar a nomeação interativa de arquivos?
- Selecione Device Settings > Device Options.
- Nas opções de configuração, selecione Permitir nomeação de arquivo. Isso adicionará um ícone no Scan Station com o rótulo “File Naming.”
- Selecione Salvar para salvar o arquivo de configuração.
- Exporte o arquivo de configuração para o nível superior de uma unidade USB e verifique se o nome do arquivo é kss.xml.
- Atualize o Scan Station: O senhor pode usar a unidade USB (continue na próxima etapa) ou fazer a atualização remotamente a partir do computador host.
- Insira a unidade USB no Scan Station.
- Selecione Não nos prompts.
- Selecione o ícone Nomeação de arquivo.
- Selecione Advanced.
- Selecione Permitir nomeação de arquivo durante a digitalização.
Nota: Se o senhor executar esse procedimento sem a unidade USB inserida no Scan Station, as alterações não serão permanentes.
-
Como faço para usar o microfone do Scan Station?
O senhor pode usar o microfone para criar anotações de voz que podem ser enviadas por e-mail como um anexo. O senhor também pode enviar um arquivo de anotação de voz separado para qualquer destino, exceto uma impressora.
-
Quais acessórios estão disponíveis para a Scan Station?
Para obter informações sobre acessórios, clique aqui. Selecione a guia Produtos relacionados e, em seguida, Acessórios.
-
Trabalhos: O que é o modo Jobs?
O modo Trabalhos permite definir uma combinação de configurações de digitalização predefinidas, destinos e grupos de usuários. Um trabalho é exibido como um botão na interface de usuário do Scan Station e oferece digitalização com um toque. Depois que o senhor configurar um trabalho (ou trabalhos), somente o(s) botão(ões) do trabalho será(ão) exibido(s) no Scan Station.
-
O que é o aplicativo Scanner Administration?
O aplicativo Scanner Administration permite que o senhor crie arquivos de configuração e se comunique com dispositivos Scan Station na rede; esse aplicativo minimiza a necessidade de acesso individual a vários Scan Stations. É necessário instalar o aplicativo Scanner Administration no computador host para configurar e trabalhar com o Scan Station. As seguintes guias estão disponíveis no aplicativo:
- Scanner – permite monitorar as estações de digitalização que foram descobertas e configuradas, carregar arquivos de configuração, atualizar informações do dispositivo e obter arquivos de registro de uma estação de digitalização específica.
- Configuration – permite que o senhor crie e modifique arquivos de configuração. Depois que o senhor tiver criado pelo menos um arquivo de configuração, essa tela exibirá uma lista de todos os seus arquivos de configuração.
-
Quais idiomas são compatíveis com o Scan Station?
O Scan Station é compatível com os seguintes idiomas: Inglês, francês, italiano, alemão, espanhol-internacional, português-brasileiro, holandês, tcheco, russo, turco, polonês, grego, romeno, húngaro, japonês, coreano, chinês-simplificado e chinês-tradicional.
-
Por que não consigo enviar documentos digitalizados para o e-mail?
Siga estas etapas:
- Verifique se o servidor de e-mail está configurado corretamente. (Consulte o Administrator’s Guide – “Configuring email settings.”)
- Verifique se o destino do e-mail está configurado corretamente. (Consulte o Administrator’s Guide – “Setting up an email destination.”)
- Salve a configuração.
- Faça upload do arquivo de configuração para o Scan Station.
Solução de problemas
-
Se estiver ocorrendo "Erros inesperados" ou multialimentações contínuas, faça uma calibração do UDDS.
Assista aos vídeos a seguir para fazer uma calibração do UDDS.
Calibração do UDDS para a versão 1.3.67 ou posterior.
Calibração do UDDS para versões anteriores à 1.3.67
-
Por que a pesquisa do Active Directory não funciona corretamente?
Siga estas etapas:
- Configure uma conexão de diretório ativo e verifique se o senhor pode concluir um “teste de conexão” com êxito.
- Verifique se a caixa de seleção Allow Email Search está marcada.
Manutenção
-
Como faço para limpar a área de geração de imagens?
1. Limpe a área superior e inferior de geração de imagens usando um pano Staticide. Tenha cuidado para não arranhar a área de geração de imagens durante a limpeza.
IMPORTANTE: Os lenços Staticide contêm isopropanol, que pode causar irritação nos olhos e ressecamento da pele. Lave as mãos com água e sabão após realizar os procedimentos de manutenção. Consulte o MSDS para obter mais informações.
2. Limpe a área superior e inferior da imagem novamente usando a almofada de limpeza óptica reutilizável para remover quaisquer marcas.
3. Quando terminar, feche a tampa da estação de digitalização com as duas mãos
-
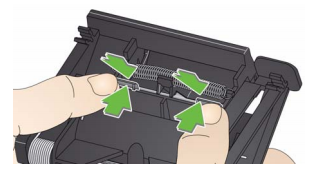
Como faço para limpar os rolos?
1. Abra a tampa do Scan Station.
2 Com uma almofada de limpeza de rolos, limpe os rolos de alimentação de um lado a outro. Gire os rolos de alimentação para limpar toda a superfície.
IMPORTANTE: a almofada de limpeza do rolo contém lauril éter sulfato de sódio lauril éter sulfato de sódio, que pode causar irritação nos olhos. Lave as mãos com água e sabão após realizar os procedimentos de manutenção. Consulte a MSDS (Material Safety Data Sheet) para obter mais informações. para obter mais informações.
3. seque os rolos com um pano que não solte fiapos.
-
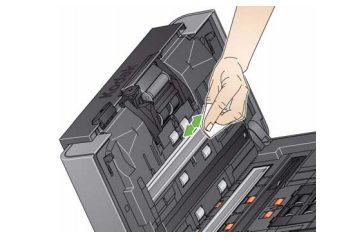
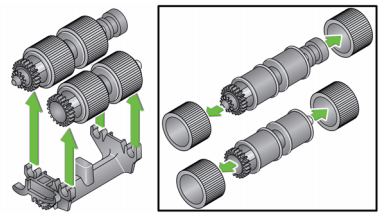
Como faço para substituir o módulo de alimentação e os pneus?
NOTA: O sensor de presença de papel está localizado à esquerda do módulo de alimentação. Tenha cuidado para não danificar o sensor de presença de papel ao remover ou limpar ao redor do módulo de alimentação.
1. Puxe contra a borda elevada da tampa do módulo de alimentação e levante-a para cima e para fora da posição.
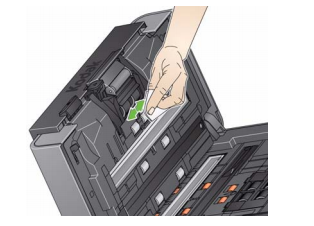
2. Gire o módulo de alimentação para frente e empurre-o para a esquerda para tirá-lo da posição.
Se estiver substituindo o módulo de alimentação, insira o novo módulo de alimentação alinhando os pinos e empurrando-o para a esquerda para encaixá-lo na posição. Certifique-se de que as engrenagens estejam alinhadas e que ele se encaixe no lugar e, em seguida, vá para a Etapa 8.
Se estiver substituindo os pneus, continue com a Etapa 3.
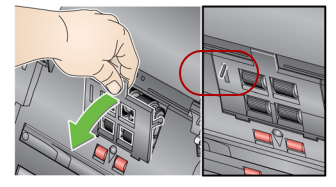
3 Remova um conjunto de núcleo levantando-o e tirando-o da posição.
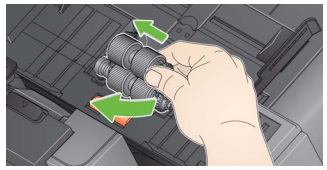
4. Remova cada pneu deslizando-o para fora do núcleo.
5. Instale cada pneu novo puxando-o cuidadosamente sobre o núcleo. IMPORTANTE:Não estique demais o pneu; ele pode rasgar.
6. Recoloque o conjunto do núcleo no módulo de alimentação. Talvez seja necessário deslizar o eixo para a direita ou para a esquerda para que o núcleo se encaixe corretamente no compartimento do módulo de alimentação.
7 Repita o procedimento de substituição descrito acima para o outro conjunto do núcleo.
8 Reinstale o módulo de alimentação alinhando os pinos e empurrando-o para a esquerda para encaixá-lo na posição.
9. Reinstale a tampa do módulo de alimentação alinhando as guias nos slots e empurrando a tampa do módulo de alimentação para baixo até que ela se encaixe no lugar.
-
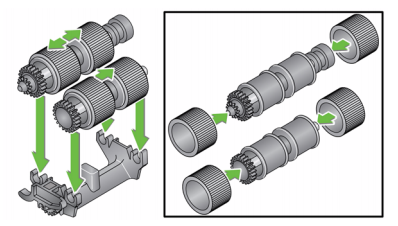
Como faço para substituir a almofada de pré-separação?
1. Remova o módulo de separação da Scan Station seguindo as etapas descritas anteriormente em “Substituição do módulo de separação e dos pneus”.
2 Segure o módulo de separação com as duas mãos e localize as duas guias que se projetam ligeiramente da parte traseira do módulo de separação.
3 Empurre as guias para baixo até que a almofada de pré-separação se projete levemente da frente do módulo de separação.
4. Segure a almofada de pré-separação e puxe-a para fora do módulo de separação.
5. Descarte a almofada de pré-separação desgastada.
6 Alinhe as abas laterais de uma nova almofada de pré-separação com os slots do módulo de separação.
7 Empurre a almofada de pré-separação firmemente nas ranhuras até que a aba da almofada de pré-separação encoste levemente nos pneus do módulo de separação.
8 Reinstale o módulo de separação alinhando as guias com as ranhuras e encaixando-o na posição.
-
O que posso fazer para ajudar a evitar atolamentos de papel?
- Para obter informações sobre como evitar atolamentos de papel, consulte o Capítulo 11 e 12 do Guia do Administrador.
-
Quais são os artigos e produtos disponíveis para os scanners Kodak Alaris?
- Para obter a lista completa dos artigos e produtos disponíveis para todos os scanners Kodak Alaris, consulte o Guia de Artigos e Produtos.