SCANMATE i940 型扫描仪 FAQs
Below are the frequently asked questions for the SCANMATE i940 型扫描仪.
Select another product by typing the name in the field below.
使用
-
如何使用智能触控?
有关使用此软件的信息,请参阅 Smart Touch 用户指南。
-
如何获得扫描仪的专业服务和支持?
有关如何联系柯达 Alaris 支持的信息,请访问 Kodak Alaris Services and Support.
-
如何查看 SVT/驱动程序 版本:
- 打开控制面板 "添加和删除程序"(XP)或 "程序和功能"(Vista 7)。
- 向下滚动到 Kodak [Scanner Model] 扫描仪
- Vista 和 7 – 版本位于最右边一列。注意版本。
- XP - 单击 ‘Click here for support information’ 链接。注意版本。
故障诊断
-
如果扫描仪运行缓慢,我该怎么办?
- 您的主机 PC 可能不符合扫描仪的最低要求。请参阅用户指南中的附录 A,规格。
- 某些影像处理功能会降低扫描仪速度。
- 您的影像输出分辨率 (dpi)可能过高。
- 您的压缩设置可能太低。
- 您的防病毒软件可能会扫描所有 TIFF 或 JPEG 文件。
- 检查您是否扫描到本地驱动器。
-
如果扫描仪运行缓慢,我该怎么办?
- 您的主机 PC 可能不符合扫描仪的最低要求。请参阅用户指南中的附录 A,规格。
- 某些影像处理功能会降低扫描仪速度。
- 您的影像输出分辨率 (dpi)可能过高。
- 您的压缩设置可能太低。
- 您的防病毒软件可能会扫描所有 TIFF 或 JPEG 文件。
- 检查您是否扫描到本地驱动器。
-
如果扫描仪运行缓慢,我该怎么办?
- 您的主机 PC 可能不符合扫描仪的最低要求。请参阅用户指南中的附录 A,规格。
- 某些影像处理功能会降低扫描仪速度。
- 您的影像输出分辨率 (dpi)可能过高。
- 您的压缩设置可能太低。
- 您的防病毒软件可能会扫描所有 TIFF 或 JPEG 文件。
- 检查您是否扫描到本地驱动器。
-
连接性: 如果计算机无法识别扫描仪该怎么做?
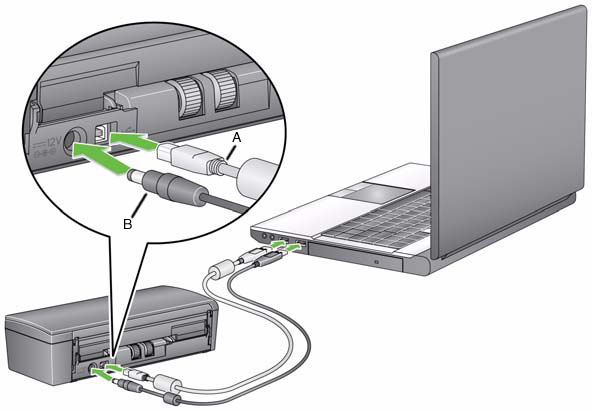
确认 USB 电缆已插入计算机和扫描仪的 USB 端口。
检查连接:
- 连接电源线并确认其已完全插入扫描仪背面的电源连接器。
- 将电源线插头连接到正常工作的电源插座。
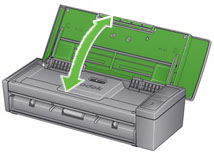
注意:如果使用墙壁开关或电源插座,请确认它们已打开。 - 打开顶盖。
绿色大于 LED 指示灯是否持续发光?
如果没有
确认电源插座是否正常工作。
- 从电源插座拔下扫描仪电源线。
- 将其他设备插入电源插座。
维护
-
影像质量:如何提高影像质量?
按照以下所述步骤清洁扫描仪:
小心:- 请勿使用气体、液体或汽油喷雾清洁剂或其他家用清洁剂。
- 请勿在热烫表面上使用清洁剂。
- 在使用前先允许表面冷却至周遭温度。
- 具备足够的通风设施。 请勿在狭窄的地区使用清洁剂。
- 清洁任何内部零部件之前,拔下扫描仪上的电源线。
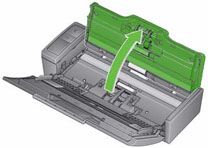
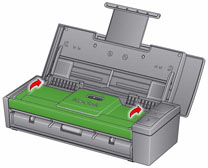
- 打开顶盖。
- 打开扫描仪护盖。
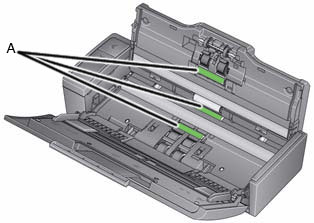
- 擦拭三个进纸滚筒 - A,使用滚筒清洁垫来回擦拭。 转动进纸滚筒以清洁整个表面。
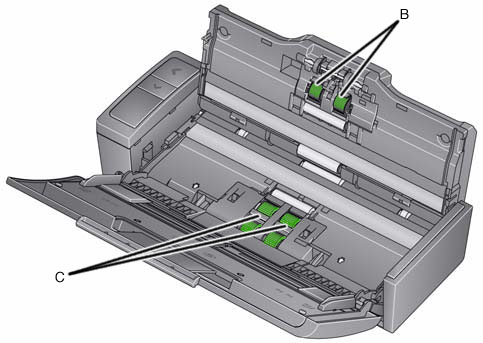
- 擦拭分纸滚筒 - B,使用滚筒清洁垫来回擦拭。 转动进纸轮以清洁整个表面。
- 使用进纸模块滚轮 - C,使用清洁垫来回擦拭。 转动进纸滚筒以清洁整个表面。
注意: 有关清洁扫描仪的详细信息,请参阅产品附带的用户指南。 - 将电源线连接到扫描仪。
- 合上扫描仪护盖。
- 扫描文档。
-
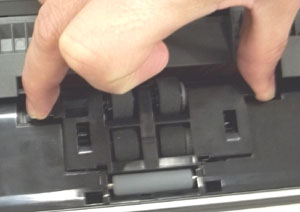
如何更换 SCANMATE i940 扫描仪的进纸模块?
卸下进纸模块:
- 打开顶盖。
- 打开扫描仪护盖。
- 断开扫描仪的电源。
- 卸下进纸模块护盖:
- 将进纸模块两侧的拉头向内挤压。
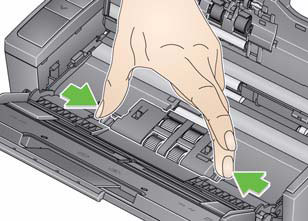
- 抬高并卸下进纸模块护盖。
- 将进纸模块两侧的拉头向内挤压。
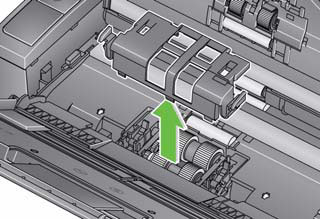
- 卸下进纸模块:
- 从底部向上推,并旋转进纸模块。

- 抬起一端,然后卸下进纸模块。
- 从底部向上推,并旋转进纸模块。
安装进纸模块:
- 将进纸模块轴的一端插入机架的插槽中。
- 插入另一端并推动进纸模块加以固定。
- 将进纸模块护盖与机架开口处对齐。
- 按下进纸模块护盖加以固定。
- 合上扫描仪护盖。
- 将电源线连接到扫描仪。
-
如何更换 SCANMATE i940 扫描仪的分纸滚筒?
卸下分纸滚筒:
- 断开扫描仪的电源。
- 打开顶盖。
- 打开扫描仪护盖。
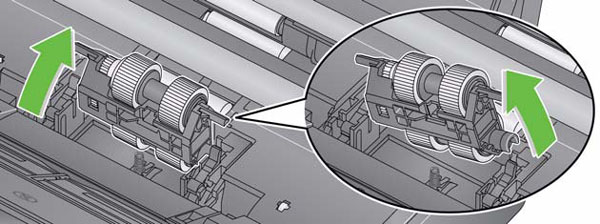
- 用指甲撬开分纸滚筒护盖。

- 卸下分纸滚筒:
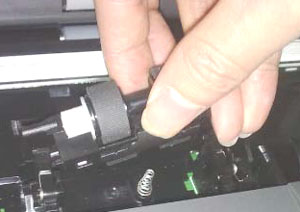
- 用大拇指和食指抓住分纸滚筒外侧边缘。
- 拉动分纸滚筒将其取出。
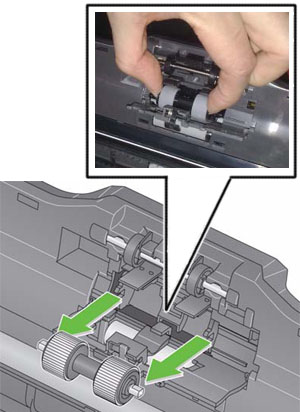
安装分纸滚筒:
- 插入分纸滚筒时,轴的平端应与机架中的插槽对齐。
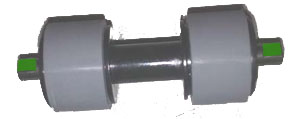
- 将分纸滚筒向下按压以固定。
- 关闭分纸滚筒护盖。
- 合上扫描仪护盖。
- 将电源线连接到扫描仪。
-
如何解决错误代码 E4(扫描仪错误)?
重新启动扫描仪:
- 关闭顶盖。
- 打开顶盖。
- 重新启动扫描应用程序并恢复扫描。
-
如何解决错误代码 U6(扫描仪护盖打开错误)?
关闭扫描仪护盖。
-
如何解决错误代码 U8(重张进纸错误)?
- 打开扫描仪护盖。
- 取出多张进纸文档。
- 将驱动程序窗口更改为您使用的纸张类型。
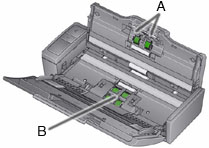
- 检查下列部件是否清洁和未磨损:
- 分纸辊 - A
- 进纸辊 - B
- 合上扫描仪护盖。
重要: 确认要扫描的文档符合以下规格:- 可接受的纸张重量:4.9 至 14.5 克 / 平方米 (10.7 至 32 磅)
- 最大文档尺寸:21.6 x 165.1 厘米 (8.5 x 65 英寸)
- 最小文档尺寸:8.0 x 5.2 厘米(3.15 x 2.05 英寸)
- 输入托盘中的最大文档数量为 20
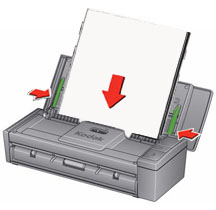
- 对齐并重新装入文档。请勿在输入托盘中装入超过 20 份文件。
- 移动导纸器,直到它们刚好接触到文档边缘。
- 重新启动扫描应用程序并继续扫描。
- 打开扫描仪护盖。
-
How do I resolve an error code U9 (Paper jam or unexpected error)?
重要:扫描仪卡纸时会发生 U9 错误。当发生意外情况 (如扫描过程中断电)时,也可能发生此错误。 扫描过程中断电。在某些较旧的计算机操作系统中,当您在没有电源的情况下使用扫描仪时,可能会出现电源短路的情况。
扫描时是否有空白页从扫描仪中退出?
----------------------------------------------------IF YES--------------------------------------------------
- 打开扫描仪护盖。
- 移除正在扫描的文档。
- 合上扫描仪护盖。
- 检查扫描仪和计算机之间的 USB 连接。如果您只使用一条 USB 电缆 (B),请在扫描仪和计算机之间连接另一条 USB 电缆 (A)。
- 对齐文档并再次将它们装入输入端。
- 移动导轨,直到它们刚好接触文档边缘。
- 重新启动扫描应用程序并尝试再次扫描。
----------------------------------------------------IF NO ---------------------------------------------------
- 打开扫描仪护盖。
- 移除正在扫描的文档。
- 清除卡纸:
- 检查扫描仪内部是否有纸屑或其他异物。
- 如有必要,清洁:
-
- 分纸滚筒 - A
- 进纸模块 - B
- 检查扫描仪内部,必要时进行清洁。
- 合上扫描仪护盖: 确认要扫描的文档符合以下规格:
- 可接受的纸张重量:4.9 至 14.5 g/m2 (10.7 至 32 磅)
- 最大文档尺寸:21.6 x 165.1 厘米(8.5 x 65 英寸)
- 最小文档尺寸:8.0 x 5.2 厘米(3.15 x 2.05 英寸)
- 对齐文档并再次将它们装入输入端。
- 移动导纸器,直到它们刚好接触到文档边缘。
- 重新启动扫描应用程序并继续扫描。
-
如何更新驱动程序?
- 转到驱动程序和下载页面 位于此处 查找最新驱动程序。
- 有关如何安装扫描仪的详细说明,请参阅《用户指南》第 2 节。
-
哪些耗材和消耗品适用于 Kodak Alaris 扫描仪?
- 有关适用于 Kodak Alaris 扫描仪的耗材和消耗品的完整列表,请查阅耗材和消耗品指南。
-
如果我的扫描有剪角,我该怎么办?
重要:如果未从输入托盘均匀送入纸张,扫描过程中扫描可能会偏斜,影像的边角可能会被剪切掉。
将文档装入扫描仪时,请执行以下操作以获得最佳效果:
- 确认所有墨水和涂改液已干。
- 去除任何订书钉或回形针。
- 对齐纸张的前缘。
- 装入纸张时,使其在输入托盘中居中,要扫描的一面朝向远离您 的方向。
- 移动侧导板,直到它们刚好接触到相纸的边缘。
- 扫描您的文档。
-
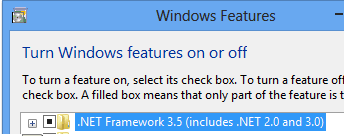
错误: 如果出现 Framework 错误,该怎么办? “未检测到 .NET Framework 版本 2.0 或更高版本。 某些同步功能可能无法正常工作。”
问题
在运行 WINDOWS 8 的系统上安装 PRESTO! BIZCARD 软件后,在安装过程中或安装完成后首次启动软件时出现以下消息:
"未检测到 2.0 或更高版本的 .NET Framework。某些同步功能可能无法正常工作。
解决方法
- 选择控制面板>程序和功能
- 打开 WINDOWS 功能: .NET Framework 3.5
- 再次安装 PRESTO!