Scan Station 730EX FAQs
Below are the frequently asked questions for the Scan Station 730EX.
Select another product by typing the name in the field below.
Installing
-
What Operating Systems are compatible on the Host computer used to set up the Scan Station?
The Scanner Administration application used with the Scan Station requires the Host computer to have one of the following Operating Systems and MICROSOFT .Net 4.0 Framework installed (this program will be automatically installed if not detected).
- WINDOWS 10
- WINDOWS 8
- WINDOWS 7
-
Why won’t the installer for the Scanner Administration application run?
You must have administrative rights to install the application on the Host computer.
- Verify that you have administrative rights and the administrator password. (Right-click on the installer file, select Run as Administrator, then follow the prompts.)
- Check your anti-virus software; this software may block an application from running.
Using
-
Can I change the settings after I create Jobs?
Job settings are modified using the Scanner Administration Application. After a Job has been defined and the configuration has been uploaded to the Scan Station, only the Jobs screen will display on the Scan Station (the normal user interface will not display)
-
Can I switch back to the manual mode after I set up Jobs?
You can access the manual mode after you remove all entries for Jobs in the configuration file (using the Scanner Administration Application). Or, you can also access the manual mode after inserting a USB drive that contains the configuration file (kss.xml). The configuration file can be exported from the Scanner Administration Application and must be named “kss.xml”. This file must also be located at the root (top) level of the USB drive.
-
Do I need a computer to set up and use the Scan Station?
You do not need a computer to use the Scan Station; however, you need a computer to create a configuration file, and to install and use the Scanner Administration application. There are two methods for configuring the Scan Station:
- Using the Scanner Administration application from a Host (remote) computer
- Copying the configuration file (kss.xml) to a USB drive, and inserting the USB drive into the Scan Station. The configuration file can be exported from the Scanner Administration Application and must be named “kss.xml”. This file must also be located at the root (top) level of the USB drive.
-
Does the Scan Station have USB and Ethernet ports?
Yes, the Scan Station 700 series has four USB ports and one Ethernet port. The USB ports are used for storing files to a thumb drive, accessing administrator settings, configuring the Scan Station, and connecting a USB Keyboard.
-
How can I determine the firmware version and Operating System (OS) of the Scan Station?
There are two ways to find this information:
- On the Scan Station, touch the icon.
- On the Host computer, open the Scanner Administration application. Select the scanner from the grid and click the icon.
-
How can I obtain professional services and support for the scanner?
For information on how to contact Kodak Alaris support, please visit Kodak Alaris Services and Support.
-
-
How do I reset the (Scan Station) settings to the factory defaults?
- Copy the configuration file to the top level of a USB drive, and verify that the file name is kss.xml.
- Insert the USB drive into the Scan Station.
- Select- No to the prompts.
- Select the Scan Station icon.
- Select Start Setup Wizard.
- Select Start the wizard or Run the Setup wizard at next restart.
- Remove the USB drive.
To reset the configuration settings:
- Create a default configuration file.
- Upload the configuration file to the Scan Station.
-
How do I save error log files?
You may be asked by service personnel to provide log files to help diagnose an issue. You can send log files as an attachment to an email.
There are two ways to obtain log files:
Using the Scanner Administration application:- Open the Scanner Administration application on the host computer.
- Click the Scanners tab.
- Select Scanners > Device, then select "Save all logs...".
- Save the file(s).
Using a USB drive:
- Create a configuration file, and save it to an unused USB drive. Verify that the file name is kss.xml.
- Insert the USB drive into a USB port on the Scan Station.
- select - No to the prompts.
- The Scan Station will display the settings icons.
- Use the arrows to scroll to Diagnostics (the wrench icon). Select the icon.
- Select Save Logs, then touch Yes to save the log file to the USB drive. The analog.log and kss700.xml.log files will be saved to the USB drive.
-
How do I use interactive file naming?
- Select Device Settings > Device Options.
- From the configuration options, select Allow File Naming. This will add an icon on the Scan Station labeled “File Naming.”
- Select Save to save the configuration file.
- Export the configuration file to the top level of a USB drive, and verify that the file name is kss.xml.
- Update the Scan Station: You can use the USB drive (continue with the next step), or do the update remotely from the Host computer.
- Insert the USB drive into the Scan Station.
- Select No to the prompts.
- Select the File Naming icon.
- Select Advanced.
- Select Allow File Naming During Scan.
Note: If you do this procedure without the USB drive inserted in the Scan Station, the changes will not be permanent.
-
How do I use the microphone of the Scan Station?
You can use the microphone to create voice annotations that you can send via email as an attachment. You can also send a separate voice annotation file to any destination except a printer.
-
What accessories are available for the Scan Station?
For information about accessories, click here. Select the Related Products tab, then Accessories.
-
Jobs: What is the Jobs mode?
The Jobs mode lets you set up a combination of predefined scan settings, destinations, and groups of users. A job displays as a button on the Scan Station user interface and provides one-touch scanning. After you set up a Job (or Jobs), only the Job button(s) display on the Scan Station.
-
What is the Scanner Administration application?
The Scanner Administration application lets you create configuration files, and communicates with Scan Station devices on the network; this application minimizes the need for individual access to multiple Scan Stations. You need to install the Scanner Administration application on the host computer to set up and work with the Scan Station. The following tabs are available in the application:
- Scanner – lets you monitor Scan Stations that are discovered and configured, upload configuration files, update device information, and obtain log files from a specific Scan Station.
- Configuration – lets you create and modify configuration files. After you have created a minimum of one configuration file, this screen will display a list of all of your configuration files.
-
What languages does the Scan Station support?
The Scan Station supports the following languages: English, French, Italian, German, Spanish-International, Portuguese-Brazilian, Dutch, Czech, Russian, Turkish, Polish, Greek, Romanian, Hungarian, Japanese, Korean, Chinese-Simplified, and Chinese-Traditional.
-
Why can’t I send scanned documents to email?
Follow these steps:
- Verify that your email server is set up correctly. (See the Administrator’s Guide – “Configuring email settings.”)
- Verify that the email destination is set up correctly. (See the Administrator’s Guide – “Setting up an email destination.”)
- Save the configuration.
- Upload the configuration file to the Scan Station.
Troubleshooting
-
If experiencing “Unexpected Errors” or continuous Multi-feeds, do a UDDS Calibration.
Watch the following videos to do a UDDS Calibration.
UDDS calibration for version 1.3.67 or later.
UDDS calibration for versions prior to 1.3.67
-
Why doesn’t the Active Directory search work properly?
Follow these steps:
- Set up an active directory connection, and verify that you can complete a “test connection” successfully.
- Verify that the check box for Allow Email Search is selected.
Maintaining
-
How do I clean the imaging area?
1. Wipe the upper and lower imaging area using a Staticide wipe. Be careful not to scratch the imaging area when cleaning.
IMPORTANT: Staticide wipes contain isopropanol which can cause eye irritation and dry skin. Wash your hands with soap and water after performing maintenance procedures. Refer to the MSDS for more information.
2. Wipe the upper and lower imaging area again using the reusable optics cleaner pad to remove any streaks.
3. When finished, close the Scan Station cover with both hands
-
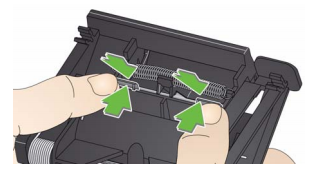
How do I clean the rollers?
1. Open the Scan Station cover.
2. With a roller cleaning pad, wipe the feed rollers from side to side. Rotate the feed rollers to clean the entire surface.
IMPORTANT: The roller cleaning pad contains sodium lauryl ether sulfate which can cause eye irritation. Wash your hands with soap and water after performing maintenance procedures. Refer to the MSDS (Material Safety Data Sheet) for more information.
3. Dry the rollers with a lint-free cloth.
-
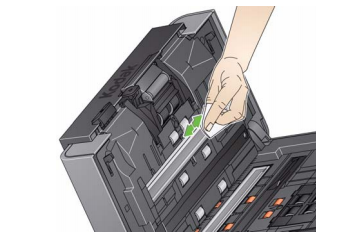
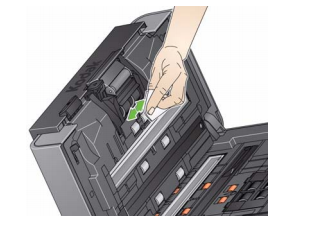
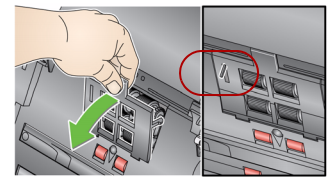
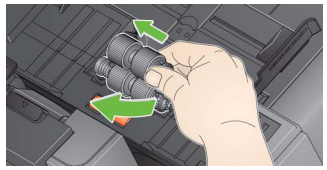
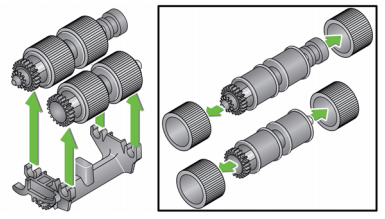
How do I replace the feed module and tires?
NOTE: The paper present sensor is located to the left of the feed module. Be careful not to damage the paper present sensor when removing or cleaning around the feed module.
1. Pull against the raised edge of the feed module cover and lift it up and out of position.
2. Rotate the feed module forward and push it to the left to lift it out of position.
If you are replacing the feed module, insert the new feed module by aligning the pins and pushing it toward the left to fit it into position. Be sure the gears are aligned and it snaps into place, then go to Step 8.
If you are replacing the tires, continue with Step 3.
3. Remove one core assembly by lifting up and out of position.
4. Remove each tire by sliding the tire off the core.
5. Install each new tire by gently pulling it over the core. IMPORTANT:Do not overstretch the tire; it may tear.
6. Replace the core assembly in the feed module. You may need to slide the shaft to the right or left so the core fits properly within the feed module housing.
7. Repeat the replacement procedure outlined above for the other core assembly.
8. Reinstall the feed module by aligning the pins and pushing it toward the left to fit it into position.
9. Reinstall the feed module cover by aligning the tabs in the slots and pushing the feed module cover down until it snaps into place.
-
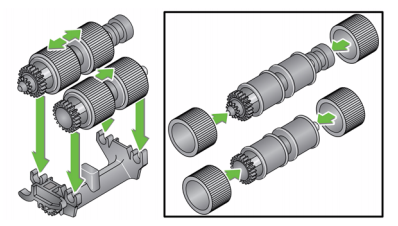
How do I replace the pre-separation pad?
1. Remove the separation module from the Scan Station by following the steps previously described in “Replacing the separation module and tires”.
2. Hold the separation module in both hands and locate the two tabs which protrude slightly from the back of the separation module.
3. Push down on the tabs until the pre-separation pad protrudes slightly from the front of the separation module.
4. Grasp the pre-separation pad and pull it out of the separation module.
5. Discard the worn pre-separation pad.
6. Align the side tabs of a new pre-separation pad with the slots on the separation module.
7. Push the pre-separation pad firmly in the slots until the preseparation pad flap rests lightly against the separation module tires.
8. Reinstall the separation module by aligning the tabs with the slots and snapping it into position.
-
What can I do to help prevent paper jams?
For information about preventing paper jams, see Chapter 11 and 12 of the Administrator’s Guide.
-
What supplies and consumables are available for KODAK Scanners?
For information about available materials, see the Supplies and Consumables Catalog for KODAK Scanners